Easy Summer Menu: Baked Martabak (Martabak Panggang)

Summer is almost here! Time to slow down and enjoy the gorgeous days. As we ease into the warmest season of the year, I plan to stay cool and light in both what I wear and what I cook/eat.  So for food, I am compiling recipes that might go well with my idea of summer menu: simple, light, and delicious. One dish that I thought about immediately was martabak, one of my favorite street food in Indonesia.

Baked Martabak

Recently, inspired by a recipe I found online, I baked martabak instead of following the street vendor’s traditional way: frying (less oil mess, less stress). They came out crispy and delicious.

Here’s my version:

(Make 8-10 martabak)

INGREDIENTS:

  • 3 eggs
  • 1 pound of sirloin ground beef
  • 1 teaspoon of minced garlic
  • 3 bunches of scallions (chopped)
  • 1 egg for eggwash
  • ½ cup of vegetable oil
  • 1 teaspoon of curry powder
  • 1 tablespoon of cayenne pepper powder
  • Salt

STEPS

Making the mixture:

  • Preheat the oven to 350 degrees Fahrenheit.
  • Heat up a tablespoon of vegetable oil in a medium pan (over medium heat)
  • Add garlic and let it sizzle for two minutes.
  • Add curry powder, cayenne pepper powder, and salt. Mix together with the garlic.
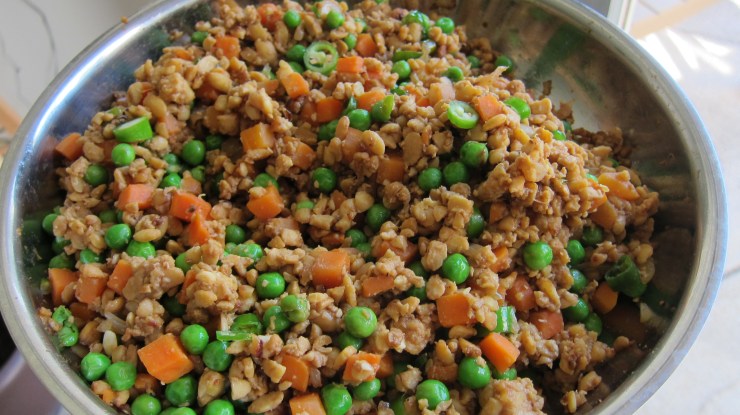
  • Add ground beef and mix it with the spices.
  • Dump the juice from the meat and let the beef continue to brown.
  • Taste and add spices if necessary.
  • Add the chopped scallions, mix them up with the beef, and set the pan aside.

Folding the martabak:

  • Pick up 3 fillo dough sheets for each piece of martabak, brush with the rest of vegetable oil, scoop the beef mixture, and add to the middle of the sheets. Repeat.
  • Place the folded martabak on a greased oven tray, brush the top with eggwash, and place into the oven for 20 minutes until they are golden brown.
  • Let them rest for a couple of minutes, cut in the middle, and serve. (I made mine a bit bigger and then I cut them before serving).
  • Serve with Thai peppers (optional).

    Hot out of the oven

More to come later!

Crispy Baked Tilapia

(Author revised on April 12, 2013)

I like a variety of white fish like snapper, halibut, and tilapia. In my opinion, tilapia happens to have a very mild taste suitable for Indonesian cooking, which normally uses a lot of spices. For readers in Indonesia, I imagine dori, gurame, or red snapper fillets would work great for this recipe.

So here’s what we’re going to need (feel free to adjust the spices to fit your preference):

  • 4 Tilapia fillets (medium size)
  • 1 teaspoon of salt
  • ½ teaspoon of ginger powder
  • 1 teaspoon of black pepper powder
  • 1 teaspoon of cayenne pepper powder (substitute with chili or paprika powder if you prefer it to be milder)
  • A pinch of dried oregano (optional)
  • 1 tablespoon of white vinegar (optional)
  • 1 lemon

Steps:

  • Spray or grease the oven tray with a little bit of olive oil or canola oil.
  • (Optional) Mix the white vinegar with a little bit of water in a small bowl and give the fillets a quick rinse. And then rinse with water. (I do it to lessen the fishy aroma a little bit.)
  • Place the fish on an oven tray.
  • In a separate bowl, mix the salt, ginger, black pepper, cayenne powder.
  • Heat the oven to 425 degree Fahrenheit.
  • Sprinkle and coat the fish with the mixed spices. Let the fillets sit for about 10 minutes.
  • Cook for 12-13 minutes.  Do a longer bake time if the fillets are bigger/thicker.
  • For more crisp, turn the oven broiler (after baking) for about 3-4  minutes. Leave the oven door slightly (like 2 inches) open to avoid charring.
  • When it’s done, the fish will have that light golden color and crispy texture on the outside but fluffy in the inside.
  • Serve with lemon wedges on the side.

Serve 2-3 people

Tempeh with Chillies and Vegetables – An Easy and Tasty No-Meat Dinner

Once in a while, Jeff and I do a no-meat dinner at home. Meatless menu isn’t really anything new to Indonesians. Many depend on either plant-based like tempeh or on a variety of seafood anyway as their sources of protein.

I think I’ve mentioned in my other recipe that tempeh is one of staple food in Indonesia. This soy-based patty shows up a lot at Indonesians’ dinning tables along with its partner: the fried white tofu (sadly, I can’t seem to find the same kind of tofu here in the US). Usually, tempeh is sliced, seasoned with a little bit of salt, fried until its light golden, and served with chillies, some vegetables, and rice. I also like it cooked with chillies. We call it sambal tempeh and it’s got both spiciness and sweetness to it. Yum!

Here’s my version. I like to serve this dish with my spinach and corn vegetable soup, crispy baked tilapia , and rice.

  • 2 tempeh patties (usually sold at the grocery’s organic section)
  • 1 bag of frozen peas and carrots (small bag)
  • 2 tablespoon of minced garlic
  • 6 hot finger peppers (chopped)
  • 4 Thai peppers (chopped)
  • 3 tablespoon of low sodium soy sauce
  • 2 tablespoon of sweet soy sauce (substitute: mix two tablespoon of soy sauce and one tablespoon of honey)
  • ½ onion (chopped)
  • Black pepper powder to taste
  • 2 tablespoon of canola or vegetable oil

Steps:

  • With clean hands, break the tempeh patties into smaller parts.
  • Heat up the oil in a pan (medium heat)
  • Add the garlic and onion into the pan and let them sizzle for a minute until they turn yellow.
  • Add the tempeh and mix it up with the garlic and onions. Let it cook for a while until it turns light brown.
  • Add the peas, carrots, chopped peppers, both soy sauces, and black pepper.
  • Stir and mix it all up.
  • Cover with a lid and let them cook for another 10 minutes.
  • Serve with rice

Serve 4-6 people

Mini Mascaporne, Hazelnut, and Honey Cup Loaf Cakes

A good and descriptive storytelling could really captivate an audience attention and inspire her to try something new. My friend Leena and I would engage in a food talk once in a while. We’d discuss…well…good food, restaurants and their cuisines, and recipes. Recently, she talked about her favorite cupcakes in such great details that images of cupcakes started to float around in my mind. For days! And I wasn’t even a cupcake person. She’s really good, that Leena :). It was a sign for me to bake again.

So I studied a few recipes and combined the two that I liked the most. I wanted something that had a great combination and wasn’t too sweet. Inspired by Giada De Laurentiis’ Spiced Apple Walnut Cake (that she turned into a cupcake recipe in her Weeknights with Giada book) and Mascaporne Mini Cupcakes, I present my latest baked goods: Mini Mascaporne, Hazelnut, and Honey Cup Loaf Cake sans frosting.

Jeff and I simply love the firm and nutty texture of the cake. The aroma and taste of honey and hazelnut are just delightful. These little cakes make a perfect pair with morning coffee. Watch them disappear quickly from the tray 🙂

Here’s the ingredients list:

  • 8 ounces of Mascaporne cheese (1 cup)
  • 3 eggs
  • ¾ cup of vegetable oil
  • ¾ cup of light brown sugar
  • ½ cup of honey
  • 1 tablespoon of pure vanilla extract
  • 3 cups of all purpose flour
  • 1 ½ teaspoon of baking powder
  • 1 ½ teaspoon of baking soda
  • ½ teaspoon of fine sea salt
  • 1 cup of chopped hazelnut (or Filbert)

Steps:

  • Preheat oven to 350 degrees F.
  • Line two 24-mini muffin tray with paper baking cups.
  • In a large bowl and using a hand mixer, mix Mascaporne, eggs, and vegetable oil until they become one creamy mixture. Add brown sugar, honey, and vanilla extract. Mix all wet ingredients well.
  • In another large bowl, combine the dry ingredients: flour, baking powder, baking soda, and sea salt.
  • Mix the combined dry ingredients with the wet mixture. Fold the chopped hazelnut.
  • Using a spoon, scoop the batter to fill the mini cups well below the rim
  • Bake for 15  minutes. The cakes will have this beautiful light golden shade. (To make sure the cakes are done, I insert a skewer into the cake. When it comes out clean, I know the cakes are ready to cool down.)
  • Let the cupcakes cool down for 20 minutes before serving.

Make 48 mini cup loaf cakes

Roast Chicken with Turmeric and Spices

The quest to have a collection of easy and flavorful roast chicken recipes continues.

I definitely have been on a roast chicken kick lately. I love the crispy exterior, but tender interior, and flavorful roast chicken. Now, the goal is to have a few different versions. So I play with the seasonings each time I roast. Last month I did a dry-rub with rosemary and thyme. This time, I’ll do a wet-rub with turmeric and other spices!

My recipe below is inspired by a traditional Javanese yellow fried chicken or ayam goreng kuning (the yellow coloring comes from turmeric). When you travel to Java Island, this is the kind of fried chicken you’d find at local restaurants. The chicken tend to be much smaller, so flavorful and aromatic, crispy on the outside but so tender in the inside. It is usually served with white rice, some green vegetables, and chilies. I am a huge fan!

For my version though, I opt out of frying and choose to roast instead. I find roasting to be a lot “friendlier” than frying on many levels. With roasting, I get to just place the chicken in the oven, set the timer, and leave it alone for a while. Also, I would not have to deal with the oil splattering onto my skin, my clothes, and my whole kitchen. Less mess, less stress. Most importantly, roasting does the job. The chicken comes out with that beautiful golden color and the crispy and tender texture that I expect.

So here’s how we do it. We will need:

  • A whole chicken (cut up into 12 pieces—I like smaller cuts)
  • 5 shallots (chopped)
  • 1 tablespoon of minced garlic
  • 1 tablespoon of coriander powder
  • 1 teaspoon of turmeric powder
  • 1 teaspoon of ginger powder
  • Salt
  • Black pepper
  • An inch of galangal root (smashed)
  • One lemongrass (the white part only, smashed)
  • You may substitute the galangal root and lemongrass with lemon zest and juice from two lemons.

Steps:

  • In a large and deep cooking pan, boil 3 cups of water, and then turn the heat off.
  • Add all of the spices into the water and mix it well. Let it cool down. Taste and add salt if necessary.
  • Place the chicken into the spice mixture.
  • Once the liquid is cool enough, using your clean hands, rub the chicken with the spice mixture. Make sure that the chicken is well coated. (Would be good if the chicken is submerged.)
  • Cover with a lid and store in the fridge overnight or at least half a day.

Roasting:

  • Preheat oven to 400 degrees F.
  • Place chicken on an oven rack set on top of a tray (to collect the juices)
  • Cook for 40-45 minutes (until chicken temperature reaches 165 degrees F).
  • For golden color on the outer part, I turn on the broiler and let the chicken brown for 2-5 minutes. To avoid charring, leave the oven door slightly ajar (a couple of inches) and please don’t wander off too far 🙂
  • Serve with rice

Serve 4 generously

Oxtail Soup with Vegetables

April’s last days were quite cold. The wind and low temperature were pretty brutal compared to the 80-degree weather we had in March!  This spice-filled Indonesian oxtail soup loaded with vegetables was definitely a great pick-me-up meal on such chilly days.

My secret to having a great oxtail soup is to slow-cook it the night before serving. On the next day, the vegetables and broth would become so much more flavorful and the tender meat would just fall off the bones so easily. The comforting effect makes the soup worth the time and effort.

Here’s my version:

  • 6  cuts of oxtail (get different sizes: large, medium, and small)
  • 6 carrots (peeled and slice into thin cuts)
  • ½ of cauliflower (cut into small florets)
  • A handful of green beans (trim the end parts and then cut into shorter lengths)
  • 1 tablespoon of minced garlic
  • 1 sweet onion (chopped)
  • ½ teaspoon of nutmeg
  • Salt
  • Black pepper
  • 3 Thai peppers (chopped)

Steps:

  • Place the oxtails in a large cooking pot.
  • Add water enough to cover the oxtails.
  • Bring to boil over medium heat and then reduce the heat to simmer. Cover the pot with a lid.
  • Add the garlic, onion, nutmeg, salt, black pepper, and Thai peppers. Let simmer for 2 ½ hours.
  • Check frequently to add water. Make sure that the oxtails are always submerged.
  • After 2 ½ hours, add the chopped vegetables and cook for another 10-15 minutes.
  • Taste and add salt or pepper if necessary.
  • Cover the pot and let it rest and cool off.
  • Keep in the fridge until it is time to serve.
  • Heat up by bringing the soup to a boil. Serve over rice.

Serves 4-6

What’s your comfort one-pot meal?

Hazelnut Shortbread with Mascaporne and Blackberries – Venturing into the Baking World

I found and tried another amazing cookie recipe recently. It’s called Hazelnut Shortbread with Mascaporne Frosting and it produces these pretty little cookies with a taste of harmony. The nutty and crumbly hazelnut shortbread is nicely joined by this soft and creamy mascaporne cheese with vanilla beans and sweet and tart blackberries. Simply marvelous.

Beautiful recipes, such as this one, inspire me to get to know baking much better. That and a cookie monster named Jeff.

Thank you, Vegetarian ‘Ventures.

Click here for more baking inspiration

Easy Dry-Rub Roasted Chicken

Inspired by the delicious main course at Chicken Hut in Chicago, I went on a quest to make my own flavorful and juicy chicken. Since I don’t have the proper grill that produces great char-broiled chicken like the hut does, I settle with oven roasting.

On this quest, I am also learning, from this one easy recipe, that a good dry-rub made of spices and herb make a big difference in the flavor of roasted chicken. Generosity in seasoning matters too.

So here’s one result from the quest. This time, I went with herb-based dry rub for the chicken and a parsley salsa for dipping. The chicken came out of the oven with this beautiful golden color, crispy exterior, tender and juicy meat, and a wonderful fragrant.

For the roasted chicken, we will need:

  • A whole cut up chicken (that I cut up more into a total of 12 smaller pieces).
  • Salt
  • Pepper
  • 2 teaspoon of chili pepper powder
  • 2  teaspoon of ginger powder
  • 2  teaspoon of coriander powder
  • Lemon zest from 1 lemon
  • Olive oil
  • A pinch of dried rosemary (optional)
  • 1 thyme sprigs

For the salsa (dipping sauce):

  • 2 medium tomatoes (diced)
  • 2 Thai or cayenne peppers (chopped)
  • A handful of chopped parsley
  • Lemon juice from 1 lemon
  • ½ chopped sweet onion

Steps:

  • Preheat the oven to 400 degrees F.
  • Place the 12 pieces of chicken on a large oven tray.
  • Drizzle olive oil (lightly) on the chicken and then coat them evenly.
  • Season generously with salt, pepper, chili pepper powder, ginger, coriander, and lemon zest.
  • Sprinkle a pinch of dried rosemary and place the thyme sprigs on the chicken.
  • Make sure that both sides of the chicken are well coated with the seasonings.
  • Arrange so that the skin side faces up.
  • Roast for 40-45 minutes (until the chicken temperature reaches 162 degrees F).
  • Dump the juice, remove the sprigs, and let the chicken cool down for 5 minutes before serving.

Note: Next time I’ll try seasoning the chicken a day before I cook them (and leave them wrapped in the fridge).

For the salsa:

  • While the chicken is roasting, heat up a small pot over medium heat.
  • Place the tomatoes and let them cook for a few minutes until they become soft and juicy.
  • Add the lemon juice.
  • Mix the onions, peppers, and parsley.
  • Turn off the heat and serve on a bowl.

Serve with these red potatoes and baguettes:

(Click on the image for recipe)

Beef Chorizo Sloppy Joe – Mini Burger Series

I had been wanting to try beef chorizo. Before this entry, I had only tasted a vegetarian version of chorizo, made from tempeh, and it was delicious. The wonderful smokey and peppery seasonings flavor had stayed in my food memory waiting to be experienced once again.  But how to prepare and enjoy beef chorizo was another question.

One Sunday morning I turned on the TV, flipped to Food Network, and saw an episode of the Sandwich King where the host, by chance, was making: Sloppy Jose with Chorizo, Charred Poblanos, and Avocado Crema. “Well, that’s it,” I thought, “My question received an answer.” 🙂 What a great coincidence. I accepted the show as a sign for me to continue the mini burger fiesta Jeff and I were having. This time it was with beef chorizo!

Here’s my adapted version of the Sandwich King’s recipe:

  • 1 Mexican beef chorizo (the packet I got was 10 oz or a bit more than a half a pound)
  • 1 cup store-bought refrigerated fresh salsa
  • Light shredded mozzarella
  • 2 red bell peppers (julienned)
  • Salt
  • Pepper
  • Cumin powder
  • 4-6 dinner rolls (halved)

Steps:

  • Fire up the grill.
  • Prepare an aluminum foil, fold along the edges to create barrier (so that the meat and salsa won’t run away from the foil while cooking), and poke a few holes in the middle of the foil using a fork (to create a way out for the fat and moisture). Place on the grill.
  • Unwrap the chorizo and place on an aluminum foil.
  • Let the meat cook for 15-20 minutes (I choose to cook it on a grill outside because it could get very smokey and very fragrant).
  • After it cooks for 15 minutes, add the salsa to the meat, and let it cook for another 10 minutes. Place on a plate.
  • Saute the julienned red bell peppers with a little bit of canola oil, salt, pepper, and cumin powder (until the peppers become soft).
  • Toast the buns
  • Sprinkle the cheese on the bottom bun, add a scoop of the chorizo salsa mix, put a couple of sliced peppers on top of the mix, and place the top bun.

Since these sloppy joes are already so flavorful and rich, I opt out of making the avocado crema.

(Makes 6 delicious mini sloppy joes)

Almond Blackberry Cookies – Venturing into the Baking World

I search for great flavor combinations in meals and also in sweets. I appreciate the creativity of balancing tastes, color, and texture in cooking and baking. Though I still feel more passionate about cooking and savory things, I say, “Why not?” to learning the art of baking. The way I see it: I already cook a lot, I might as well be able to make a few great sweets too :). So here’s my latest baking recipe trial that resulted in another favorite for Jeff and I.

Recently, I found this Peanut Butter Cookies with Blackberry Jam recipe from Giada De Laurentiis. The recipe is also included in her latest book, Weeknights with Giada (pg. 215).

I did a few little tweaks to this recipe to fit my preference:

  1. Instead of using ¾ cup of peanut butter, as suggested on the ingredient list, I used ¾ cup of ground raw almonds (that I ran through the food processor with 1/8 cup of olive oil). I blended the raw almonds and olive oil in a food processor until it became as grainy as possible. The almonds mixture did not have the same consistency as peanut butter of course, but I actually liked the chunky and grainy texture better.
  2. I also opted out of the step of rolling the dough in ¼ cup of sugar and went directly to form the doughs into little balls ready for the blackberry filling in the middle. (I also made the dough balls smaller than the ones in the recipe.)
  3. I used blackberry preserves, which I already had in my fridge, instead of jam.

Such delightful little cookies! I love the soft crunch, the subtle nutty almonds, and the sweet and tangy tastes of the blackberry preserves. I see them disappear quickly from our cookie box 🙂