Summer Party on a Plate: Grilled Sea Scallops, Guacamole, Mango Salsa, and Beets Orange Salad

There are days when I get highly motivated. When they come, something like this materializes:

Party on a plate by Tiny Chili Pepper

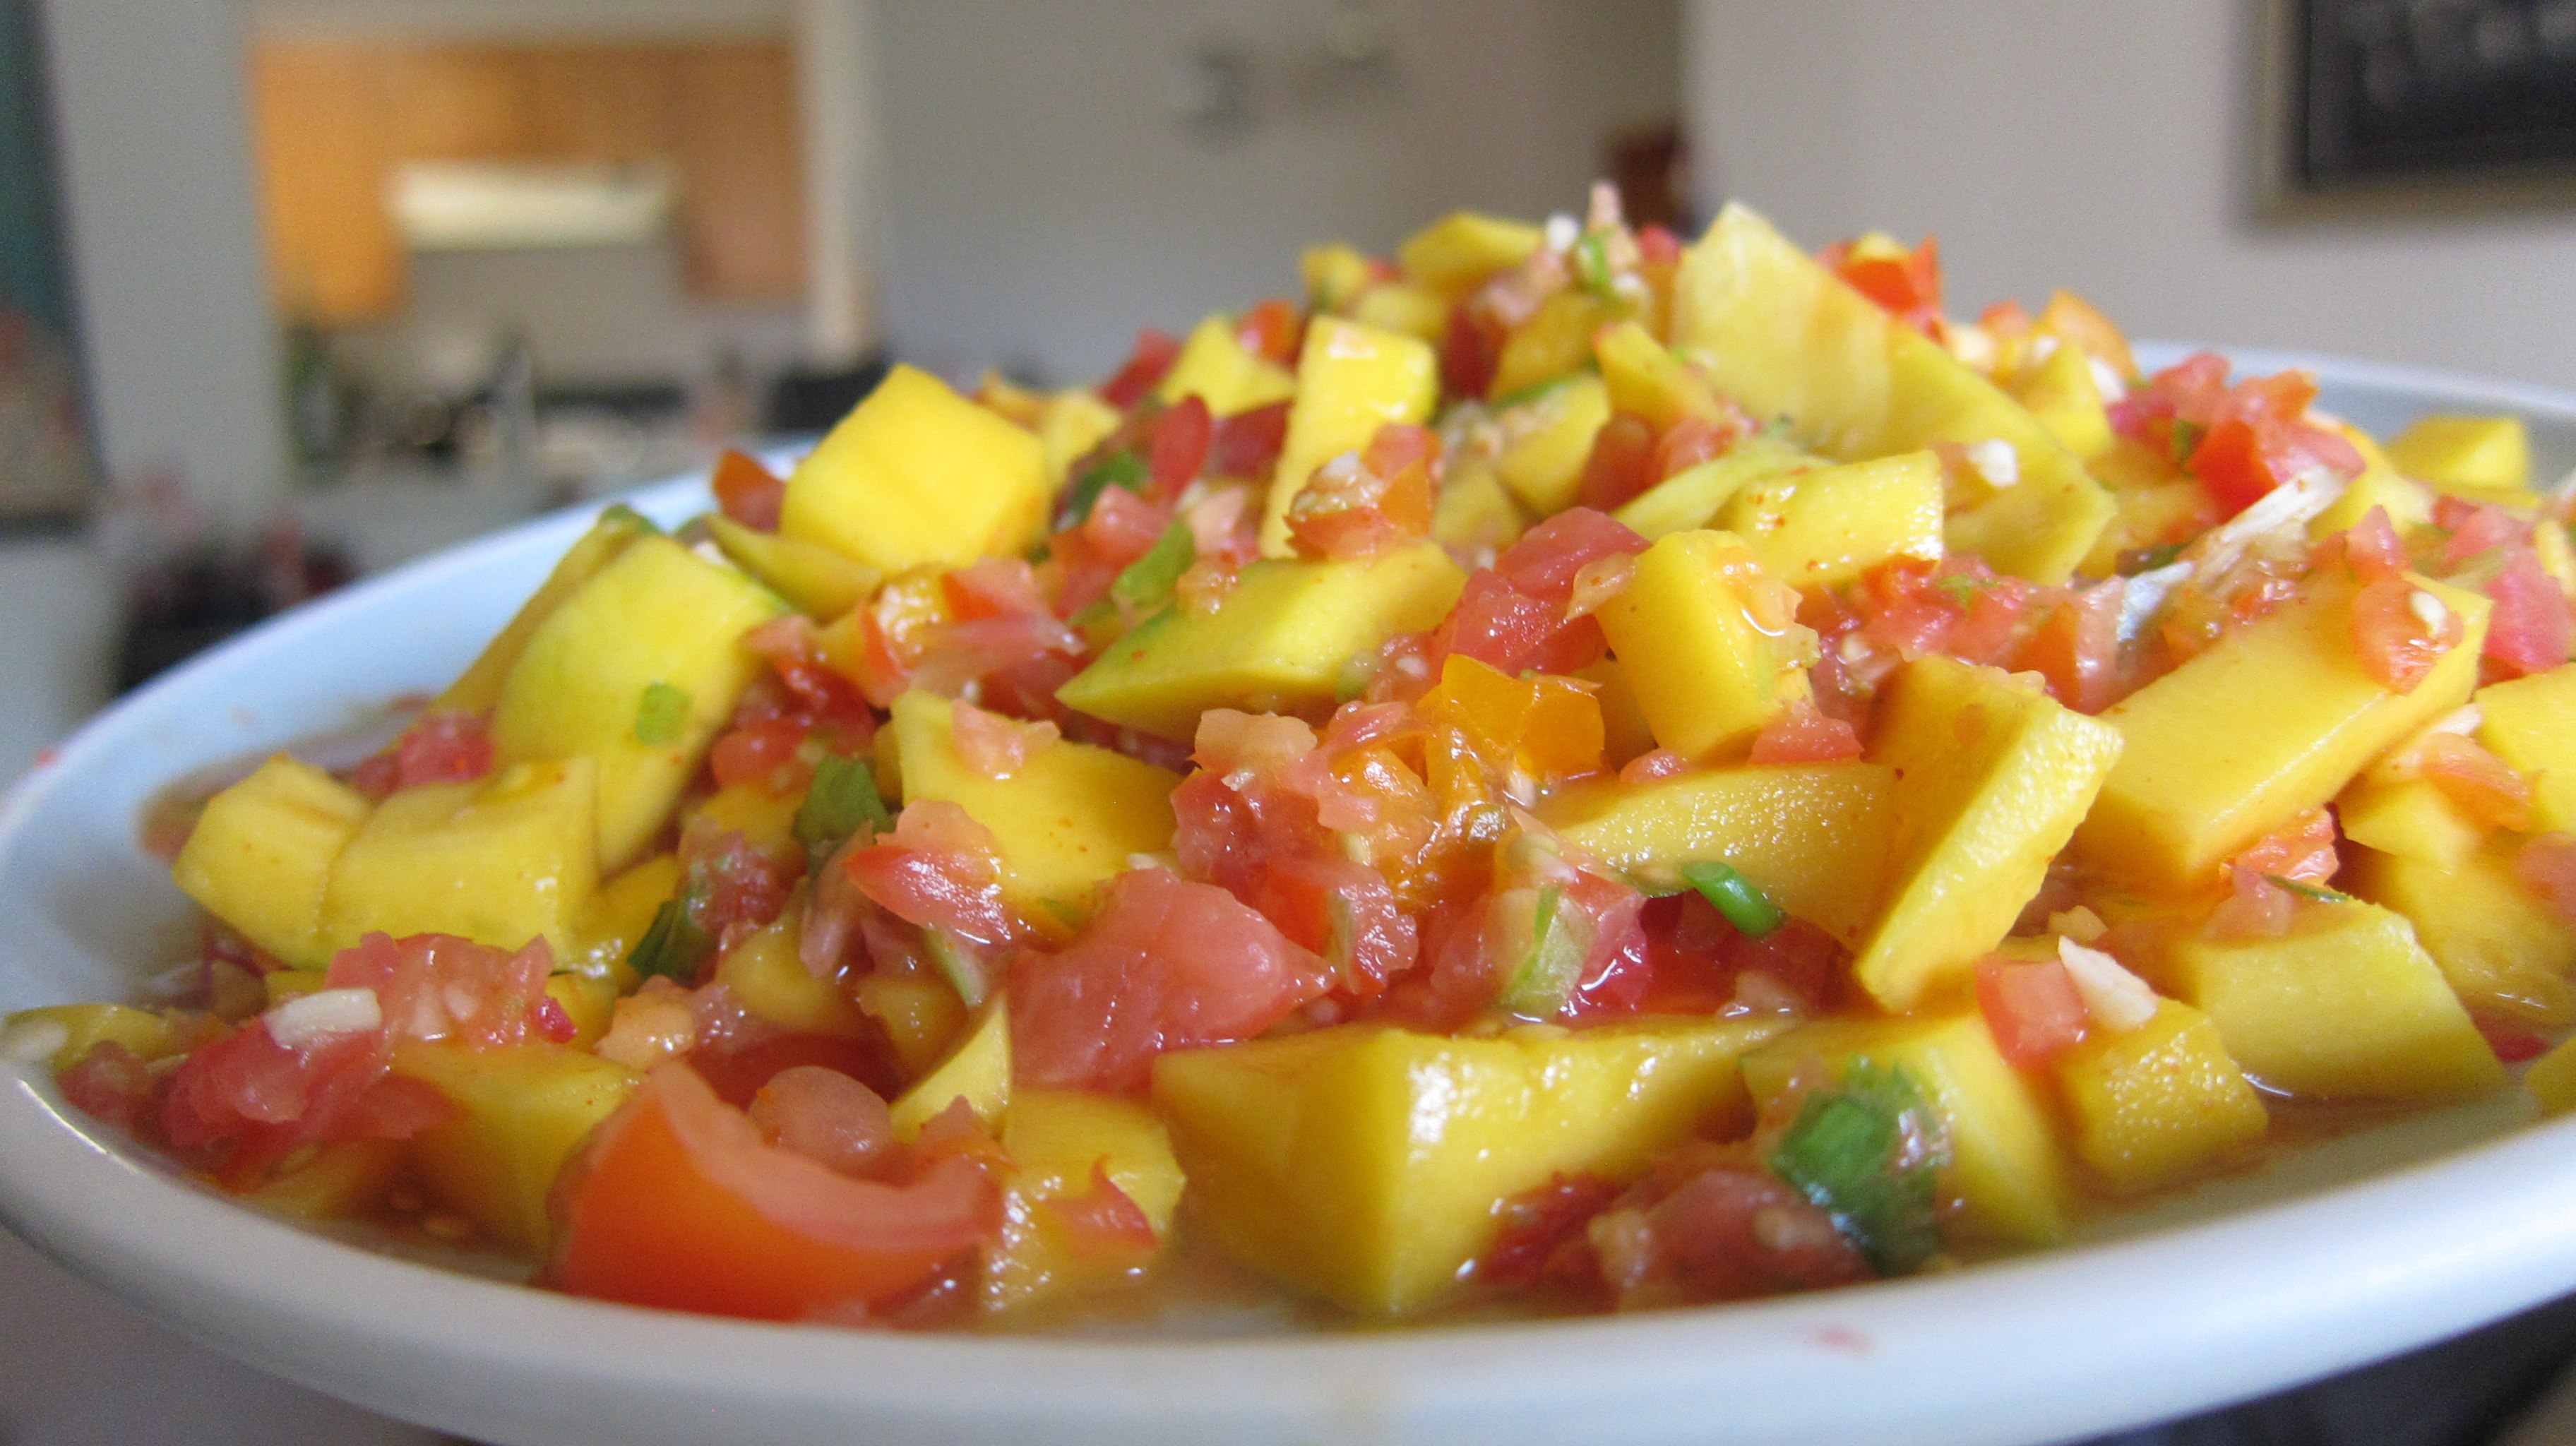
Moved by a warm summer day with the perfect breeze, I went a little overboard with Wednesday’s dinner menu.  I wanted something light and colorful.  Grilled scallops, mango salsa, and guacamole immediately came to mind. But as I walked around the farmers market, I also got some beets (and a lot of other things!). I had never cooked beets before but I was curious about it.

IMG_5134

When I got home, I realized that I forgot to get cilantro for my mango salsa and guacamole. So, I substituted with green onions, which worked out quite well for both dishes—though I still prefer using cilantro. For this version of my mango salsa, I chopped 10 cherry tomatoes, two garlic, four cayenne peppers, and three green onions in a food processor. I added a little bit of lime juice and salt to the salsa before I mixed it with the mango slices. I also cut more cherry tomatoes, each into four pieces, and added them to the mango salsa.

IMG_5126

For the guacamole, I followed the recipe I wrote last year. The combination of creamy avocado with cumin, lime juice, salt, garlic, and onion made such a wonderful treat (cilantro would add a fantastic taste and aroma to it too). And it wasn’t hard to make at all! I like to have guacamole and mango salsa as side dishes for grilled fish as well.

Guacamole by Tiny Chili Pepper

For the sea scallops, I marinated them with extra virgin olive oil, lemon juice from one lemon, salt, and pepper. After 15 minutes, I threaded the scallops onto the skewers (which I have soaked in water for about 15 minutes prior to using). It’s much easier to grill scallops this way. Then, I grilled them for about three minutes on each side.

Grilled Sea Scallops by Tiny Chili Pepper

I saw a recipe called Perfect Roasted Beets with Orange Slices in a magazine and was intrigued by it. I basically followed the recipe but did not have sherry vinegar so I went without. The result? The orange slices and juice gave sweet taste to the dish. But the beets’ earthy flavor was definitely something for me to get used to. Let’s see, maybe I could find a different beet recipe to try. Do you have one to recommend?

IMG_5118

Thanks for reading and have a great weekend!

Chicken Satay with Walnut Sauce

Chicken Satay w Walnut Sauce by Tiny Chili Pepper 1

Grilling on skewers seems like a universal way to cook meat, don’t you think? Most citizens of the world probably have their own versions and names for it. Still, it’s the same delicious idea :). Indonesians (and some of our South East Asian neighbors) call this method as sate or satay. As a popular street food in the country, satay comes in different variation depending on the region. In my hometown, chicken satay with peanut sauce seems to be consistently in demand. One common scene close to dinner hours would be seeing a satay vendor push his cart on residential streets while calling out, “Teee…Sate.” Someone would usually shout back from their porch, “Satay man, come.” The vendor would stop in front of that house and start grilling. With a traditional bamboo fan on one hand, he’d fan the charcoal grill on his cart and turn and adjust the satay, to make sure they’re cooked properly, with the other hand. A wonderful aroma would fill the air. Once the satay is done, he’d start mixing the peanut sauce, shallots, sweet soy sauce, and chili paste and place the satay on top of it. I loved watching this “performance” when I was little.

by Tiny Chili Pepper

I think what makes chicken satay so special would be the sauce. That nutty, sweet, savory, and tangy flavors…all in perfect harmony. Inspired by a recent cookout at a friend’s house, I decided to make my version of chicken satay this week. I’ve made peanut sauce before but this time I used the raw walnuts that I had at home. So here it goes:

For the chicken satay, we’ll need:

  • 5-10 skewers (soaked in water for 15 minutes)
  • 2-3 boneless and skinless chicken breasts (get the smaller size). You could also use boneless and skinless chicken thighs. Cut into strips (same size) to make them skewer-friendly.
  • 2 tablespoon of extra virgin olive oil
  • Salt
  • Pepper
  • Coriander powder
  • Ginger powder
  • Lime juice from ½ lime

Walnut sauce:

  • 1 cup of raw walnuts
  • 3 shallots
  • 4 garlic
  • 3 cayenne peppers
  • Lime zest from 1 lime
  • Lime juice from ½ lime
  • Salt
  • 2 tablespoon of sweet soy sauce (substitute with: a mix of 1 tablespoon of light soy sauce and 1 tablespoon of honey)

Steps:

  • Marinade the chicken strips with olive oil, lime juice, a pinch of salt and pepper, and a dash of coriander and ginger powder. Set them aside for 10-15 minutes.
  • In a food processor, mix: walnuts, shallots, garlic, peppers, salt, lime zest, and lime juice.
  • Heat up a non-stick pan and cook the walnut mixture for two or three minutes until it starts to brown.
  • In a bowl, mix the cooked walnut blend with the sweet soy sauce. Taste and adjust accordingly. I like to add thinly sliced shallots to the sauce at the end.
  • Thread the chicken meat onto the skewers.
  • Fire up the grill and cook them thoroughly (mine went for about 5 minutes on each side).
  • On a serving plate, set the chicken satay and drizzle with the walnut sauce.

with Mango Sambal by Tiny Chili Pepper

Great to serve with rice or grilled corn or just by itself. I served mine with  mango sambal and rice. A nice dinner-for-two out on our little patio 🙂

Have a great day and thanks for coming!

A Favorite Summer Salad

Hi all! I hope you are having a wonderful summer wherever you are. Doesn’t it seem like the season is evaporating so quickly?

This summer, I found a favorite salad combination: arugula, cherry tomatoes, feta cheese, walnut, peaches/apples/nectarines (pick one or use all of them), with fresh squeezed orange and lemon juice- based dressing mixed with olive oil, honey, dijon mustard, green onions, and cayenne peppers.

Summer Salad by Tiny Chili Pepper

Arugula has this wonderful peppery taste that I like so much. The selection of bountiful summer fruits add natural sweetness to the bite. Salty feta cheese, crunchy walnut, chopped green onions, and cayenne peppers liven things up with their distinct flavors. Oh, and the dressing! It enhances the peppery, tangy, sweet, and refreshing taste of this salad. Such a great companion for grilled fish/shrimp/sea scallops, turkey sandwiches, or even steak.

Summer Salad with Grilled Turkey Sandwich by Tiny Chili Pepper

Here’s the list for the salad (serve 2):

  • 3-4 cups of arugula (you could also add radicchio or other greens that you prefer)
  • ½ cup of crumbled feta cheese
  • ½ cup of walnut (chopped or not, you decide 🙂 )
  • 1 cup of cherry tomatoes
  • 1-2 peaches/apples/nectarines (sliced)

For the dressing, mix the following in a bowl:

  • ½ cup of olive oil
  • Juice from 1 orange
  • Juice from 1 lemon
  • 1 tablespoon of honey
  • ½ tablespoon of dijon mustard
  • 2 green onions (chopped)
  • 2 cayenne peppers (chopped)
  • Salt and pepper

Optional: you could also add a little bit of dill to the dressing

Combine the arugula, walnut, cheese, and fruits in a big bowl and mix with the dressing. Serve immediately. My mouth is watering as I type up this recipe 😀

What’s your favorite summer salad? Do share.

Thanks for reading!

Recipe inspiration came from: Arugula, Watermelon, Feta Salad by Ina Garten

Stir Fry: Green Beans and Tempeh

I enjoy a tasty and crunchy vegetable dish. When I want an easy one, I often turn to stir-frying (similar to sautéing) things like green beans, bitter melon, asparagus, broccoli, Chinese broccoli, Napa cabbage, carrots, and many more. Cook with a little bit of oil, shallots, garlic, hot peppers, and light soy sauce and watch how the vegetables turn into wonderful delights. When I want something more substantial out of these veggies, I combine them with either Shiitake mushroom or tempeh. Superb!

Green Beans and Tempeh by Harini

Green beans and I go back a long way. Years ago in early college days, days of my first attempts to cook, a friend noted that I cooked green beans a lot. He’d joke and say that it seemed like it was the only thing I was able to do :D. He wasn’t wrong. It was! 😀

Tempeh with Green Beans by Harini

Anyway, in this recipe I choose to mix crunchy green beans with tempeh. Tempeh, a soybeans-based patty, is so versatile and a source of protein. Indonesians use it as their meat substitute. Here in the US, tempeh can be easily found in the organic section.

Ingredient list:

  • 1 organic soy tempeh (8 oz) (cut into four pieces and slice into thin cuts)
  • A handful of green beans (about 2 cups)
  • 2 shallots (chopped)
  • 2 garlic (chopped)
  • 2 Thai peppers, also called as Bird’s Eye peppers (chopped)
  • 2 tablespoon of light soy sauce
  • 3 tablespoon of vegetable/canola oil
  • ¼ cup of water

Steps:

  • Heat up a medium pan over medium heat
  • Add 2 tablespoon of vegetable/canola oil
  • Brown both sides of tempeh (turn only once)
  • Remove from the pan and set aside
  • On the same pan, use remaining oil if available, if not, add 1 tablespoon of vegetable/canola oil
  • Add shallots and garlic and let them cook for 2-3 minutes
  • Add the light soy sauce, Thai peppers, and green beans
  • Stir and mix them together
  • I usually add a little bit of water to help the vegetable cook better (about 1/4 cup)
  • Cover the pan with a lid and let it cook for about 5 minutes or until the liquid starts to boil. Taste and adjust.
  • Remove pan from the heat and add the cooked tempeh. Mix everything together and serve with jasmine rice.

Hope you like it!

More favorite tempeh recipe:

Tempeh with Chilies and Vegetables

Chili-Topped Tempeh

***

A little reflection:

I think of cooking, like writing, as one of my creativity outlets. One that allows flow to happen and take over me for a little bit. Maybe my friend and fashion blogger (and a fellow cooking enthusiast), Leena, would agree that there are some similarities in the process of putting together a beautiful outfit and making a delicious dish. I imagine they both require imaginative minds; attention to texture, colors, feel, and in cooking: taste; and appreciation for beauty. Best of all, they both create enjoyable results!

Cooking might not create flow for everyone as it does for me. Besides, different folks different strokes, right?

So, what about you, dear readers?

What fully absorbs and captures your creative energy?

Egg Noodles and Sea Scallops in Eggplant, Pepper, and Tomato Sauce

Egg Noodle with Scallops in Eggplant/Tomato Sauce by Harini

My kind of pasta dish: spicy and loaded with seafood and vegetables.

Egg Noodles with Sea Scallops in Eggplant/Tomato Sauce by Harini

Last summer, I wrote about an eggplant/peppers/tomato dish that I learned from a good friend of mine. I really liked the dish and this time I decided to mix it up with some egg noodles and sea scallops. Definitely another favorite pasta dish: light, infused with great fresh produce flavors, and boy…would you just look at the colors! Such a treat for the palate AND the eyes.

Here’s how I do the eggplant/peppers/tomato sauce:

  • Get 2-3 smaller and skinnier eggplants (or 1 big eggplant)
  • Halve the eggplants and cut into 4 long pieces
  • Chop them up into shorter cuts
  • Dice 4 medium size tomatoes
  • Mince 4-5 garlic
  • Chop 1 red bell pepper
  • Chop 5-7 hot finger peppers (Serrano or jalapeno would work too. Warning: spicy! Please adjust to your spicy-tolerance level)
  • Heat up a medium pot with a tablespoon of olive oil
  • Let the garlic sizzled for 2 minutes, add all of the above, sprinkle a little salt and pepper into the pot
  • Close with a lid and cook until the eggplants turned soft and translucent (15-20 minutes over medium heat)

Prepare the egg noodles:

  • Bring water to a boil in a medium pot, add a little bit of olive oil and salt, and cook 2-3 cups of egg noodles for about 6-8 minutes (or as directed on the bag)
  • Drain and set aside

Prepare the sea scallops:

  • Drizzle extra-virgin olive oil and lemon juice from 1-2 lemons on the (thawed) 8-10 scallops
  • Sprinkle a little bit of salt and black pepper
  • Let them sit for about 10-15 minutes to marinate
  • Heat up a non-stick pan (medium heat) and sear the scallops for 2-3 minutes on each side (until both sides get that beautiful golden crust).
  • Set aside

Mix the egg noodles with the eggplant/pepper/tomato sauce, top it with some scallops, and eat up! :).

(Serve 2)

We’re inching closer to spring time in this part of the world. Still cold. But at least the sun is out today! Wishing you all for some good weather wherever you are.

Thanks for stopping by!


Spicy Shredded Chicken

Spicy Shredded Chicken by Harini

(My version of Ayam Suwir. Origin: Bali)

Another big hit at home: tender, juicy, flavorful shredded chicken, covered in a mixture of cooked chili peppers. There’s heat, spices, but also a hint of sweetness from the cooked peppers, shallots, and garlic. Very exciting for the palate, that’s for sure. I learned about this dish from a friend from Bali many years ago and have been a fan ever since.

Like many of you cooking enthusiasts out there, I adjust recipes to suit my taste preference. Here’s a version that I am very pleased with, for now ;).

Note: Some prefer to boil the chicken with spices until it is cooked, then shred, and mix it with the blended and cooked chili peppers mixture. I, however, find that when boiled, the chicken gets to be a bit too dry. So what I do is I marinate the chicken overnight or half a day, roast it in the oven, shred, and mix with the peppers.

Serve 3-4

Ingredient list:

For the roast chicken:

  • 5-6 chicken thighs, bone-in and skin-on (chicken breast would work too)
  • 4 shallots
  • 4 garlic
  • 3 keffir lime leaves (could be substituted with lime zest from 2 limes)
  • 1 lemon grass (could be substituted with lemon zest from 1 lemon)
  • 1 inch of galanga root
  • 2 teaspoons of coriander powder
  • ½ teaspoon of turmeric powder
  • ½ teaspoon of ginger powder
  • Salt

For the chili pepper mixture:

  • 1 red bell pepper
  • 4 Thai peppers (also called Bird’s eye chili). Please adjust to your spicy-tolerance level.
  • 3 shallots
  • 3 garlic
  • Salt
  • 1 tablespoon of vegetable or canola oil

Steps in preparing the chicken:

  • Fill up 1/3 of a medium/large pot with water
  • Chop in a food processor: shallots, garlic, and keffir lime leaves. Add them into the pot of water along with lemon grass, galanga root, coriander, turmeric, ginger powder, and salt to create the marinade for the chicken.
  • Bring the marinade liquid to a boil and remove from the heat.
  • Add the chicken into the marinade liquid, cover with a lid, and let it cool down before moving it to the fridge (marinate for half a day or overnight).

After the marinating is done, place the chicken on an oven tray, heat up the oven to 400 degree F, and roast it for 30-40 minutes (until it reaches 165 degrees F). Once the chicken is cooked, let it cool down, and shred it using a fork. Remove the bones.

While the chicken is roasting, prepare the chili pepper mixture:

  • Chop in food processor: bell pepper, Thai (Bird’s eye) peppers, shallots, and garlic.
  • Heat up a medium pan and add vegetable oil (over medium heat)
  • Add the pepper, shallot, and garlic mixture into the pan and let it cook for 6-8 minutes or until the moisture evaporates.
  • Remove from the heat.
  • Add and mix the shredded chicken

Shredded chicken mixed in chili peppers

Serve with jasmine rice and a side of stir-fried cabbage with green onions. Why cabbage? I think cabbage is naturally sweet therefore a great neutralizer for my spicy chicken. I chop up 1-2 garlic, 2 green onions, ½ of cabbage. I cook the garlic and green onions with a little bit of vegetable oil and add the chopped cabbage. I add a little bit of water to help the cabbage cook faster, sprinkle a little bit of salt, cover the pan with a lid, and let it cook for 5 minutes or until the vegetable wilt. Remove excess water before serving. (Optional: scrambled eggs make a nice addition to the cabbage dish too.)

Stir-fry cabbage by Harini

Hope you like it!

Have a great week, everyone. Thanks for reading.

Green Pea Salad Over Broiled Halibut

Green pea salad by HR

People say we eat with our eyes. There might be some truth to that statement. I like this warm green pea salad recipe, another creation of Giada De Laurentiis, not only for its taste but also for its beautiful colors.

I must admit that I never really thought much of green pea before, let alone turning it into something appetizing. To me it was just some complementary vegetable used in a soup or in fried rice or just served (sadly and quietly) steamed as a side of something else better and tastier. And Jeff confirmed. He said he didn’t really care for green pea until he tried this salad. In this recipe, the vegetable gets a special attention enough to transform its plain being into a flavorful and visually appealing dish. Sometimes it really does depend on how we cook things, doesn’t it?

Green peas salad on broiled halibut by HR

In Giada’s recipe, the salad is served over baked halibut fillets. As usual, I did a few things differently. First, I used regular green pea instead of petite pea. Second, I made the salad a little bit garlicky and of course spicy by adding Serrano peppers ;). Third, since I prefer to have my fish crispy on the outer part and flaky inside, I broiled the halibut instead of baking it. Lastly, the recipe called for fresh mint and thyme, which I didn’t have this second time I made it so I went without.

The result? Sweet but yet spicy with a hint of lemon, nicely seasoned, and surprisingly filling salad. A perfect companion to the flavorful, lemony, and flaky broiled fish. The combination makes a great dinner menu. I added boiled potatoes drizzled with olive oil and sprinkled with salt and pepper as a side but I really didn’t need to. The fish and salad were quite filling by themselves.

Here’s my adapted version to serve two people:

Salad ingredient list:

  • 1 small bag of frozen peas (thawed)
  • 4 garlic (chopped)
  • 3 shallots (thin sliced)
  • 1 red bell pepper (sliced)
  • 3 table spoons of extra virgin olive oil
  • 2 Serrano peppers (you could also use other bigger peppers like jalapeno, hot fingers, cayenne, etc.)
  • Lemon zest from 1 lemon

Broiled halibut ingredient list:

  • 2 halibut fillets (enough for two people)
  • Lemon juice from 2 lemons
  • 3 garlic (chopped)
  • 1/4 extra virgin olive oil
  • Salt and black pepper

Steps:

  • As suggested in the original recipe: I mixed the lemon juice, chopped garlic, olive oil, salt and pepper in a bowl. Then I added the halibut fillets in the bowl, covered it with a plastic wrap, and let the fillets marinate for about 30 minutes in the fridge.
  • Then I heated up a medium pan and added: olive oil, garlic, shallots, and bell pepper to cook for about 6 minutes until they became soft and translucent. Once they were cooked, I turned off the heat, and added the thawed peas, salt, pepper, and lemon zest. Mixed all of them together nicely and set aside.
  • After the 30 minutes marinating time was up, I placed the halibut fillets on an oven tray (sprayed with olive oil), and broiled them for 10-13 minutes (no turning) or until they had these golden color around the edges. I also made sure that there was about 6 inches (about 15 cm) distance between the broiler and the tray to avoid charring.
  • I served the fillets and topped them with the green pea salad.

Green peas salad on top of broiled halibut by HR

Thanks for coming and have a great day!

Original Recipe: Roasted Halibut with Pea and Mint Salad, (De Laurentiis, Giada. Giada at Home. Clarkson Potter, 2010. Pg. 134)

Online version: Roasted Halibut with Pea and Mint Salad

Sugar and Bourbon Steak

Steak night by HR

Craving for a good steak for dinner tonight? I recently tried this great and easy recipe: Sugar Steak with Bourbon from Amanda  (Amanda & Merrill) at Food52.

Steak fiesta by HR

The recipe called for bourbon as part of the steak marinade. I know. You’re probably thinking about the strong aroma of that potent liquor. No worries. Once the steak is cooked you’d only end up with a tender, juicy, sweet, and savory steak sans the bourbon scent.

I adjusted the recipe slightly to serve dinner for two instead of for three to four people.

Ingredients:

  • I went with 3/4 pound of rib eye (instead of flank steak as the recipe suggested)
  • Two tablespoon of light brown sugar
  • Three tablespoon of bourbon
  • I used a pinch of cayenne pepper and chili pepper for an extra kick 😉 (instead of red pepper flakes)
  • Kosher salt

Here’s how I did mine:

As suggested by the recipe, I mixed the bourbon, sugar, cayenne pepper, chili pepper, and salt in a bowl and rubbed it on the steak. I transferred the steak and its marinade into a ziplock bag and let it sit in the fridge for two hours. Then I broiled it for about 7—8 minutes on each side until the temperature reached 150 degrees Fahrenheit for medium well (instead of medium rare). I followed Amanda’s suggestion for the 4—6 inches tray distance from the broiler.

I served the steak with sweet corn-pickled sweet and spicy pepper-roasted artichoke salad, slices of heirloom tomato drizzled in olive oil and balsamic vinegar, and celery root potato puree. What a fantastic dinner!

Buon appetito and thanks for stopping by.

Cooking inspiration for this entry came from:

Sugar Steak with Bourbon by Amanda (Amanda & Merrill) at Food52

Celery Root Potato Puree by Anne Burrell at Food Network

Fried Banana

Fried banana by HR

Fried banana by HR

Fried banana (in Bahasa Indonesia: pisang goreng), a classic Indonesian snack, comes in many versions. From the very gourmet at trendy restaurants, to the ones sold in bakeries, to the everyday version sold on the streets stacked up against food vendors cart’s glass window, the snack could easily be everyone’s favorite. It is sweet, simple, and straightforward. Pure comfort. With plenty of banana varieties (sweet ones, not so sweet ones, small ones, big ones, green, yellow, reddish-brown and names like pisang raja, pisang tanduk, etc) in this country, it only makes sense to turn them into delightful little bites.

One of my first trials in making fried banana was back in college days with a couple of friends. The three of us stood in my friend’s kitchen following my other friend’s mom’s recipe. He actually called his mom in Jakarta to get the recipe. We were serious about making this snack that night :).

Years have gone by since that day. The way I do fried banana might have evolved too. But the basic method I learned with my buddies more than a decade ago stuck with me.

Here’s the ingredient list for my version:

  • 5-6 bananas (I get the yellow ones with a little hint of green on the skin and on the crown part. They need to be on the  firm side so they won’t get mushy when fried.)
  • 1 cup of all-purpose flour
  • ½ cup of water
  • 3 tablespoon of fine sugar
  • 3 tablespoon of honey
  • 1 egg
  • ½ teaspoon of salt
  • Vegetable oil

Steps:

  • Heat up a large pan (over medium heat). Fill it with 1 or 1 ½ cup of vegetable oil (depending on how big the pan is.)
  • In a big bowl, mix flour, sugar, honey, egg, and salt. Add water to the mixture until it turns into nice and thick liquid batter.
  • Peel the bananas and cut them up into round pieces
  • Add bananas into the batter and make sure that they are all nicely coated

Banana batter HR

  • Spoon three to four pieces of bananas together (making them into clusters) into the hot oil. You could probably fry three or four clusters at the same time in the pan. Make sure that ¾ of the banana clusters are submerged in the oil. Fry each side for about 2 minutes or until it turns golden brown. Flip and fry the other side. Reduce the heat if the bananas brown too quickly.

Frying bananas HR

  • Remove banana clusters from hot oil using food strainer to drain excess oil
  • Let the bananas cool down for 5 minutes on a serving plate layered with paper towel
  • Watch them disappear quickly 🙂

Thanks for stopping by.

Have a great week ahead!

Spaghetti ala Puttanesca

Revised by author on 12/30/2013

Spaghetti ala Puttanesca
Spicy and garlicky, infused with anchovies! My kind of spaghetti…

Spaghetti ala Puttanesca

Spaghetti ala Puttanesca

Recently I stumbled upon a description of this dish in a book, called Belong to Me by Marisa de los Santos, that I checked out from the library on a whim. (Yes, though I have an Amazon Prime and a tablet, I still check out books from public library. I also still prefer books than e-books.) Anyway, one of the characters in this novel ( a book that has nothing to do with cooking by the way) described and raved about the dish in such a beautiful way that it made me hungry. Immediately! And that name, Spaghetti ala Puttanesca, the Whore’s Style Spaghetti? Wild! How could I resist the urge to try a dish with such a scandalous title?

In no time, I found tons of recipes for the dish online. I made mine using Nigella Lawson’s. This recipe had me at jalapeño. Here’s my adapted version. I liked it even more with the following revisions!

  • I used 12 10 instead of eight marinated anchovies (usually come in a tin or a jar)
  • I used five fresh jalapeno peppers (chopped) instead of pickled and chili flakes
  • I chopped five fresh tomatoes (instead of mixing them with canned tomato sauce) two heirloom and mix them with a small can (8 oz) of tomato sauce (not dice tomatoes or tomato paste)
  • Two tablespoon of olive oil
  • Two tablespoon of capers (drained and rinsed)
  • Three tablespoon of (roughly) chopped black olives Forgot to buy black olives so I went without
  • Five garlic (chopped) Four
  • A handful of parsley (chopped)

(Serves 3-4 people)

Steps:

  • Boil the pasta. Add a little bit of salt and olive oil into the water. Follow the instruction on the packaging.
  • Mix anchovies, jalapeño peppers, and garlic in a food processor then cook it with olive oil on a heated medium pot for two or three minutes.
  • Add chopped tomatoes, capers, and tomato sauce into the pot. Stir to mix everything together and let it cook for 10-15 minutes.
  • Heat up a large pan, add olive oil, garlic, chopped tomatoes, and anchovies. Mix them well. Add jalapeno peppers, black olives, and capers. Cover the pan with a lid and let it cook for 10–15 minutes
  • Drain the pasta, mix with the sauce, and add parsley
  • Serve and eat up!

Another easy and delicious recipe to keep.

Thanks for reading. Hope your week is going well!

Sources of inspiration for this blog entry:

Marisa de los Santos’ Belong to Me (pg. 44)

Nigella Lawson’s recipe: Slut’s Spaghetti