Beets and Avocado Chocolate Cake

Beet Avocado Chocolate Cake

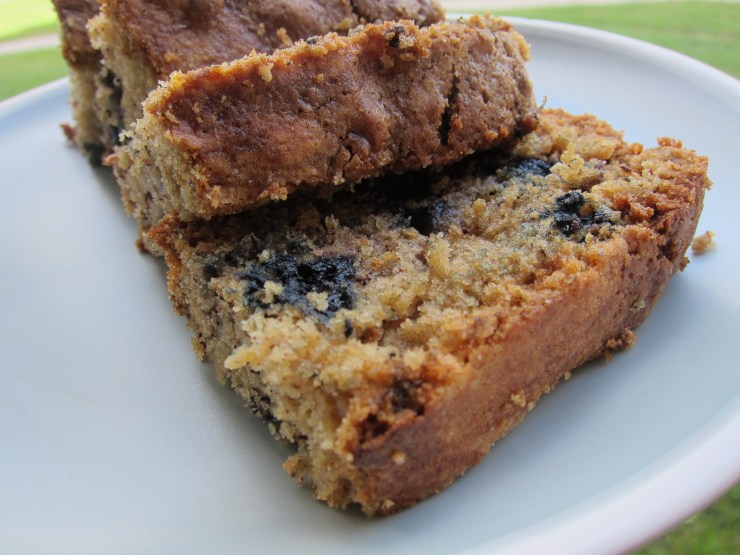
I know that a recipe is a good one when I get the approval of my friend’s 10 year-old little girl with selective food preferences. (I am a former picky eater myself, by the way.) This dessert, dear readers, got hers (and her mom’s and other tasters’ too). She didn’t notice the presence of beets and avocado in the cake until I told her. All she tasted was this chocolaty and soft cake with just the right level of sweetness, which I did too. Once I revealed the ingredients, this little girl told me that she wanted to make it and asked me for the recipe. Ha! This recipe is definitely a keeper. Thank you, fellow blogger Poppy’s Patisserie Bunny Kitchen!

Here’s my slightly adapted recipe (I didn’t do the chocolate glaze or almond toppings. Maybe next time. I thought that the cake was great by itself.)

  • 2 cups of flour
  • 1 cup of ground pecan (I think almonds, walnuts, or cashews would work nicely too.)
  • 2 tsp of baking powder
  • 2 tsp of baking soda
  • 4 tsp of cocoa powder
  • 1/4 tsp sea salt
  • 2 cups of mashed cooked beetroot (I used three small beets that I boiled for about 30—40 minutes, peeled, and ran in a food processor)
  • 1 cup of honey (The original recipe asked for half agave and half date syrups. I went with honey instead.)
  • 1 cup of mashed avocado
  • 1/4 cup of canola oil
  • 2 tsp vanilla extract
  • 1 ½ cup of dark chocolate chips, melted

Steps (I pretty much follow the original recipe):

  • Preheat the oven to 320 degrees Fahrenheit
  • Mix the dry ingredients (flour, pecan, baking powder, baking soda, salt) in a bowl
  • Mix the wet ingredients (mashed beetroot, honey, mashed avocado, canola oil, vanilla extract, melted dark chocolate) in a separate bowl
  • Combine the dry and the wet ingredients. Whisk, beat, mix it really well.
  • Pour the batter into a 9-inch round baking pan and bake it for an hour to an hour and a half. Make sure a cake tester (I use a skewer) comes out clean once inserted into the cake.

Hope you like it!

Have a good day

For Nana Banana

Original recipe: Possibly the Worlds Healthiest Chocolate Cake: Beetroot and Avocado Chocolate Cake with Chocolate Glaze and Toasted Almond Gold Dust by Poppy’s Patisserie Bunny Kitchen

Sauteed Cabbage and Carrots

I like cooking vegetables. Their wide variety gives out many different taste and menu possibilities. That, and most of the time I find a lot of the veggie recipes to be easy to make. Here’s one to prove my point: sautéed cabbage and carrots, another childhood dish I grew up with in Indonesia. Originally called, orak-arik, this recipe has to be one of the easiest things to make. With shredded cabbage, carrots, a little bit of vegetable oil, salt, black pepper, and garlic, I get a delicious plate in no time. Do you notice how sweet carrots become after being sautéed? That sweetness goes real nice with the black pepper and crunchy cabbage. In its traditional form, the recipe includes scrambled eggs in the mix. But I am making that optional here.

Sauteed Cabbage and Carrots by Tiny Chili Pepper

Cooking the cabbage and carrots

Sauteed Cabbage and Carrots by Tiny Chili Pepper

Things that we’ll need:

(Serve 2)

  • 1 small (or half of a large) cabbage head (cut into thin shreds)
  • 3–4 carrots (cleaned and chopped in a food processor)
  • 3 garlic (chopped)
  • Salt
  • Black pepper
  • 1 tablespoon of vegetable oil

Steps:

  • Heat up a medium size pan (over medium heat)
  • Add oil and then garlic. Let it sizzle for two minutes
  • Add carrots, cabbage, salt, and black pepper. Stir to mix everything together (I use two cooking spoons to mix them up).
  • Cover the pan and let the veggies cook for five minutes or until everything wilts
  • Move it away from the heat

Ideal to serve as a side to a beef or chicken dish. Don’t forget the rice :D.

Hope you like it and happy cooking!

Orak arik by Tiny Chili Pepper

Braised Collard Greens

One recipe for two dishes is possible here.  This collard greens dish uses the same ingredients as my Smoked Salmon in Spicy Coconut Milk Sauce. Serve both over hot jasmine rice, with a cup of hot tea. Let’s nourish ourselves and be content. 

Braised Collard Greens by Tiny Chili Pepper

Serve 2

Ingredients:

  • 1 bunch of collard greens (Discard the stems and center ribs. Cut the leaves into thin strips)
  • 3 garlic
  • 3 shallots
  • 5 Thai peppers (or other type of chili peppers that you prefer)
  • Salt
  • 7 fl oz of light coconut milk (1/2 can of the regular 14 fl oz—Use the rest of the milk for Smoked Salmon in Spicy Coconut Sauce, see previous blog post)
  • 1 inch cut of galangal root, smashed (No galangal root? Substitute with zest from one lemon or lime)
  • 1 tablespoon of vegetable/canola oil

Steps:

  • Chop garlic, shallots, and Thai peppers in a food processor
  • Heat up a medium size pan over medium heat and add oil
  • Sweat garlic, shallots, and peppers for about one to two minutes
  • Add coconut milk, salt, and galangal root to the pan. Stir until it starts to bubble.
  • Add collard greens into the sauce, mix, and cover the pan for five minutes or until the greens wilt. Move it away from the heat and let it sit for a while to absorb the sauce. 
  • Discard galangal root
  • Serve with hot jasmine rice 

Hope you like it and thank you for stopping by!

Smoked Salmon in Spicy Coconut Milk Sauce

Smoked Salmon in Spicy Coconut Milk Sauce by Tiny Chili Pepper

Smokey, spicy, aromatic, and easy to make. Inspired by a native dish of an area in East Java, I recently added smoked salmon in spicy coconut milk sauce into my list of favorite menu. The idea is simple: add sauce (and flavors) to an otherwise dry fish. As for the sauce, all it takes: mix coconut milk with garlic, shallots, and chili peppers and bring it to a boil. Then add galangal root  for some lemony aroma. That’s it. (The original recipe involves serving a type of smoked fish that is not available in the States. So I substitute it with smoked salmon.)

Here’s my easy recipe:

We’ll need:

  • 2 fillets of smoked salmon
  • 3 garlic
  • 3 shallots
  • 5 Thai peppers (or other type of chili peppers that you prefer)
  • Salt
  • 7 fl oz of light coconut milk (1/2 can of the regular 14 fl oz—Use the rest of the milk for Braised Collard Greens, next blog post)
  • 1 inch cut of galangal root, smashed (No galangal root? Substitute with zest from one lemon or lime)
  • 1 tablespoon of vegetable/canola oil

Steps:

  • Chop garlic, shallots, and Thai peppers in a food processor
  • Heat up a medium size pan over medium heat and add oil
  • Sweat garlic, shallots, and peppers for about one to two minutes
  • Add coconut milk, salt, and galangal root to the pan. Stir until it starts to bubble.
  • Add the fish fillets and coat with the sauce. Since the fish is already smoked/cooked, I just need to mix it with the sauce. I let it sit in the bubbling sauce for two or three minutes.
  • Discard galangal root
  • Serve with hot jasmine rice and braised collard greens

Thanks for reading and have a great week!

Giada’s Blueberry Banana Bread


Banana Blueberry Bread by Tiny Chili Pepper

Ah, the good old banana bread: rustic, classic, and reliable. A fantastic company for coffee over breakfast or snack time. I simply love it. Not to mention the aroma it creates in the apartment when I bake it.

When I started learning how to bake, I picked beginner-friendly recipes. One of them was this wonderful Dark Chocolate Banana Bread  recipe by Baker Bettie. It became a favorite. This summer, I found another hit: Banana Blueberry Bread by Giada De Laurentiis. It has made a few appearances since then. I love how the spicy nutmeg and cinnamon reveal their wonderful presence in every bite.

A favorite: banana-blueberry bread

I follow the recipe with a couple of minor adjustments:

  • Place a sheet of parchment paper to line my oven loaf pan
  • Bake the bread for 55 minutes instead of 60 minutes (my apartment’s oven tends to get really hot I think)

To see the highly recommended recipe, please click here: Banana-Blueberry Bread

Thanks for reading and I wish you a wonderful weekend!

Peace

Red Cabbage Coleslaw with Horseradish

Red Cabbage Coleslaw with Green Onions and Horseradish by Tiny Chili Pepper

Got a chance to catch up with an old roommate a couple of weekends ago. Jeff and I joined her and her family at a lake house that we rented. We got lucky. October was being kind, sunny, and warm that week. Fall painted earthy colors all around us. We spent most of the time talking, eating, and running around outside.

Dining al fresco

We covered a wide range of topics that weekend. Food was one of them. In addition to exchanging cooking ideas, we also made a few dishes. Eating well was one of the activities we planned to do at this lake house reunion. My friend made red cabbage coleslaw one night to accompany her grilled lamb chops. I’ve always loved crunchy and tangy slaw but had never made it before. When I saw hers, I made notes in my mind: make coleslaw, use red cabbage and green onions, make it colorful! It was delicious. Thanks, Lal.

Red Cabbage Coleslaw with Horseradish ala Tiny Chili Pepper

Feeling inspired and intrigued, I slightly adapted the recipe the other day. Here’s my version with horseradish punch:

(Serves two)

  • 1/2 of small red cabbage head (sliced into very thin shreds)
  • 4 green onions (chopped)
  • 1/4 cup of apple cider vinegar
  • 1/4 cup of extra virgin olive oil
  • 2 tablespoon of honey
  • 1 tablespoon of prepared horseradish
  • Black pepper
  • Salt

I mixed and whisked the apple cider vinegar, olive oil, honey, horseradish, black pepper, and salt in a big bowl. Tasted and adjusted the flavors. Then I added the cabbage and green onions, tasted and adjusted again. Mixed them up, covered, and refrigerated it for an hour/overnight before serving. Let the vegetables absorb the flavors. Great to serve alongside steak or lamb chops.

Have a wonderful weekend, everyone!

Peace

A glorious day in October

Leelanau Lake, MI

Strawberry Raspberry Jam

Strawberry and Raspberry Jam 2 by Tiny Chili Pepper

Two weekends ago, I went on a a backpacking trip on the northwest side of Michigan with my husband and a couple of friends. On our drive home, we stopped by a local eatery/store called 13th St. Market. The quaint country cafe served good traditional American breakfast that immediately fulfilled our hunger. What I really liked though were the homemade strawberry and raspberry jam. Folks, they were amazing: fresh, fruity, a little sweet and a little tart. I was intrigued. I love jam, especially the ones with chunky fruits.

At home, I searched for fruit jam recipes and found a good one: Wild Maine Blueberry Jam. I had frozen some strawberries and raspberries that I bought from the market a few weeks ago. So I used them instead of blueberries.

Strawberry Raspberry Jam by Tiny Chili Pepper

Here’s my adapted version:

  • One cup of halved strawberries
  • One cup of raspberries
  • 3/4 cup of sugar
  • A dash of salt
  • Lemon juice from 1/4 lemon

I cooked the berries and sugar in a small pot until they started to simmer and then added the salt and lemon as the original recipe suggested. I let it boiled for 40 minutes on medium heat and stirred occasionally until it thickened. Once I was done, I let the jam cooled down to room temperature and stored it (covered) in the refrigerator. From the recipes I’ve read, refrigerating fresh jam will allow it to last for two weeks. But oh, that jam was so good that we polished it off so quickly :D.

More recipes and article on fresh jam:

Make Room in the Fridge for Jam—Making Jam, Without the Can, NYTimes

Easy Strawberry Jam Recipe, Ina Garten

My next batch: Strawberry and Blueberry Jam

Fall Hike

The chance of enjoying a gorgeous autumnal vision and sipping french press coffee on a cliff overlooking foggy winding river and colorful trees seemed irresistible. We gave in to the urge to return to this hilly, curvy, and scenic trail and hike in the midst of falling leaves. It was early fall in Michigan after all, a beautiful time of the year to go for a hike.

I came to a realization during the trip. The desire to experience nature’s hidden beauties up close demanded the willingness to do some work. For this one, it required a 23-mile hike with a backpack in a forest and sleeping in a tent in torrential rain and thundering sky, that shook the ground beneath the sleeping bag and pad, for two nights. It also asked for the determination to keep going despite the rain and a sunny attitude even when the feet and shoulders started to throb. Still, efforts did pay off.

Manistee River Trail MI 1

Manistee River Trail 2

Manistee River Trail 3

Manistee River Trail 4

Manistee River Trail 5

Manistee River Trail 6

Mushroom Manistee River Trail 7

Manistee River Trail 8

Manistee River Trail 9Manistee River Trail 10

Photos properties of The Traveling Chili Pepper

Location: Michigan Manistee River Trail

Some of the backpacks: Deuter and Osprey 

Some of the sleeping bags: Lafuma and Sierra Design

Sleeping pads pump by Camp-Tek 

Shoes (waterproof, trail/hiking): Columbia and Merrell

Check out REI for more cool backpacking/hiking gears

Some rain gears: CampmorMarmotOutdoor ResearchMountain HardwareIntegral Designs

Plum Cake ala Food52

IMG_5271

When it comes to dessert, I tend to go rustic. I see this pattern on my blog too. Most dessert recipes I do involve a high degree of simplicity and…lots of fruits! Fruit cake/pastry/cookie appeal to me. They taste amazing and look genuine, sincere, and friendly. I find their uncomplicated nature to be charming.

Speaking of rustic dessert, I saw an attractive recipe from Food52 the other day: Olive Oil Ricotta Cake with Plums. Being crazy about plums, I had to try it. Though I couldn’t make mine to look as pretty as Food52’s (yet), the cake came out great, sweet, tart, and lemony–delicious, as predicted. (Notes: Mine was sweet enough, so I didn’t dust the cake with powdered sugar as the original recipe suggested. I also sliced my plums into thinner cuts.)

Hope you like it and thank you for stopping by.

Peace

Click here for full recipe: Olive Oil Ricotta Cake with Plums 

Baked Tempeh

tempeh TCP

Baked Tempeh. My parents would probably chuckle when they read this post’s title. You see, tempeh is one of Indonesia’s staple food and a favorite of mine. Typically, we’d just sprinkle salt on it and brown it in a pan with a little bit of oil. It is delicious, simple, and humble. Now, as much as I love having tempeh, I loathe getting oil splatter all over my stove, kitchen, skin, and clothes. So, my solution to avoid such a mess: bake them in the oven. Why not, right?

Tempeh absorbs seasonings and marinades quite well. So, we could just salt it OR add more flavors to it. I like to do a dry rub with a few spices for mine. Here’s how I prepare the baked tempeh:

  • Preheat oven to 350 degrees F
  • I slice tempeh into thin rectangular cuts
  • Drizzle a tablespoon of olive oil on the tempeh cuts and brush to coat evenly
  • Sprinkle a little bit of salt, cayenne pepper powder, turmeric powder, and coriander powder
  • Mix these spices with the tempeh cuts and make sure each is well coated
  • Bake for 15 minutes or until they turn golden brown

They are still that delicious, simple, and humble tempeh that I like so much, even with the added ingredients and steps.

Great to serve alongside a vegetable dish and rice

Hope you like it.

Peace!