Roast Chicken with Turmeric and Spices

The quest to have a collection of easy and flavorful roast chicken recipes continues.

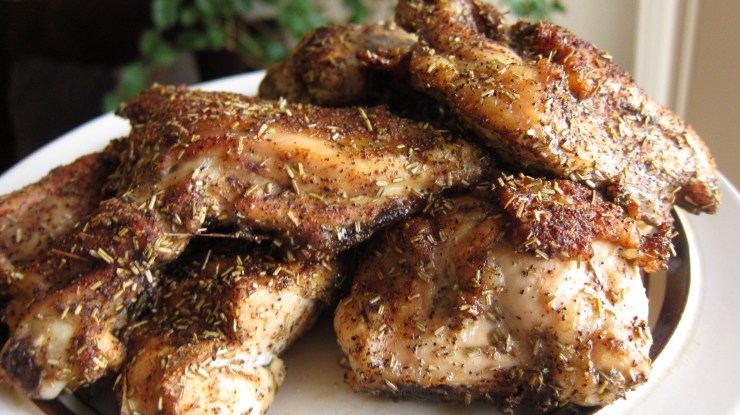
I definitely have been on a roast chicken kick lately. I love the crispy exterior, but tender interior, and flavorful roast chicken. Now, the goal is to have a few different versions. So I play with the seasonings each time I roast. Last month I did a dry-rub with rosemary and thyme. This time, I’ll do a wet-rub with turmeric and other spices!

My recipe below is inspired by a traditional Javanese yellow fried chicken or ayam goreng kuning (the yellow coloring comes from turmeric). When you travel to Java Island, this is the kind of fried chicken you’d find at local restaurants. The chicken tend to be much smaller, so flavorful and aromatic, crispy on the outside but so tender in the inside. It is usually served with white rice, some green vegetables, and chilies. I am a huge fan!

For my version though, I opt out of frying and choose to roast instead. I find roasting to be a lot “friendlier” than frying on many levels. With roasting, I get to just place the chicken in the oven, set the timer, and leave it alone for a while. Also, I would not have to deal with the oil splattering onto my skin, my clothes, and my whole kitchen. Less mess, less stress. Most importantly, roasting does the job. The chicken comes out with that beautiful golden color and the crispy and tender texture that I expect.

So here’s how we do it. We will need:

  • A whole chicken (cut up into 12 pieces—I like smaller cuts)
  • 5 shallots (chopped)
  • 1 tablespoon of minced garlic
  • 1 tablespoon of coriander powder
  • 1 teaspoon of turmeric powder
  • 1 teaspoon of ginger powder
  • Salt
  • Black pepper
  • An inch of galangal root (smashed)
  • One lemongrass (the white part only, smashed)
  • You may substitute the galangal root and lemongrass with lemon zest and juice from two lemons.

Steps:

  • In a large and deep cooking pan, boil 3 cups of water, and then turn the heat off.
  • Add all of the spices into the water and mix it well. Let it cool down. Taste and add salt if necessary.
  • Place the chicken into the spice mixture.
  • Once the liquid is cool enough, using your clean hands, rub the chicken with the spice mixture. Make sure that the chicken is well coated. (Would be good if the chicken is submerged.)
  • Cover with a lid and store in the fridge overnight or at least half a day.

Roasting:

  • Preheat oven to 400 degrees F.
  • Place chicken on an oven rack set on top of a tray (to collect the juices)
  • Cook for 40-45 minutes (until chicken temperature reaches 165 degrees F).
  • For golden color on the outer part, I turn on the broiler and let the chicken brown for 2-5 minutes. To avoid charring, leave the oven door slightly ajar (a couple of inches) and please don’t wander off too far 🙂
  • Serve with rice

Serve 4 generously

Oxtail Soup with Vegetables

April’s last days were quite cold. The wind and low temperature were pretty brutal compared to the 80-degree weather we had in March!  This spice-filled Indonesian oxtail soup loaded with vegetables was definitely a great pick-me-up meal on such chilly days.

My secret to having a great oxtail soup is to slow-cook it the night before serving. On the next day, the vegetables and broth would become so much more flavorful and the tender meat would just fall off the bones so easily. The comforting effect makes the soup worth the time and effort.

Here’s my version:

  • 6  cuts of oxtail (get different sizes: large, medium, and small)
  • 6 carrots (peeled and slice into thin cuts)
  • ½ of cauliflower (cut into small florets)
  • A handful of green beans (trim the end parts and then cut into shorter lengths)
  • 1 tablespoon of minced garlic
  • 1 sweet onion (chopped)
  • ½ teaspoon of nutmeg
  • Salt
  • Black pepper
  • 3 Thai peppers (chopped)

Steps:

  • Place the oxtails in a large cooking pot.
  • Add water enough to cover the oxtails.
  • Bring to boil over medium heat and then reduce the heat to simmer. Cover the pot with a lid.
  • Add the garlic, onion, nutmeg, salt, black pepper, and Thai peppers. Let simmer for 2 ½ hours.
  • Check frequently to add water. Make sure that the oxtails are always submerged.
  • After 2 ½ hours, add the chopped vegetables and cook for another 10-15 minutes.
  • Taste and add salt or pepper if necessary.
  • Cover the pot and let it rest and cool off.
  • Keep in the fridge until it is time to serve.
  • Heat up by bringing the soup to a boil. Serve over rice.

Serves 4-6

What’s your comfort one-pot meal?

Hazelnut Shortbread with Mascaporne and Blackberries – Venturing into the Baking World

I found and tried another amazing cookie recipe recently. It’s called Hazelnut Shortbread with Mascaporne Frosting and it produces these pretty little cookies with a taste of harmony. The nutty and crumbly hazelnut shortbread is nicely joined by this soft and creamy mascaporne cheese with vanilla beans and sweet and tart blackberries. Simply marvelous.

Beautiful recipes, such as this one, inspire me to get to know baking much better. That and a cookie monster named Jeff.

Thank you, Vegetarian ‘Ventures.

Click here for more baking inspiration

Easy Dry-Rub Roasted Chicken

Inspired by the delicious main course at Chicken Hut in Chicago, I went on a quest to make my own flavorful and juicy chicken. Since I don’t have the proper grill that produces great char-broiled chicken like the hut does, I settle with oven roasting.

On this quest, I am also learning, from this one easy recipe, that a good dry-rub made of spices and herb make a big difference in the flavor of roasted chicken. Generosity in seasoning matters too.

So here’s one result from the quest. This time, I went with herb-based dry rub for the chicken and a parsley salsa for dipping. The chicken came out of the oven with this beautiful golden color, crispy exterior, tender and juicy meat, and a wonderful fragrant.

For the roasted chicken, we will need:

  • A whole cut up chicken (that I cut up more into a total of 12 smaller pieces).
  • Salt
  • Pepper
  • 2 teaspoon of chili pepper powder
  • 2  teaspoon of ginger powder
  • 2  teaspoon of coriander powder
  • Lemon zest from 1 lemon
  • Olive oil
  • A pinch of dried rosemary (optional)
  • 1 thyme sprigs

For the salsa (dipping sauce):

  • 2 medium tomatoes (diced)
  • 2 Thai or cayenne peppers (chopped)
  • A handful of chopped parsley
  • Lemon juice from 1 lemon
  • ½ chopped sweet onion

Steps:

  • Preheat the oven to 400 degrees F.
  • Place the 12 pieces of chicken on a large oven tray.
  • Drizzle olive oil (lightly) on the chicken and then coat them evenly.
  • Season generously with salt, pepper, chili pepper powder, ginger, coriander, and lemon zest.
  • Sprinkle a pinch of dried rosemary and place the thyme sprigs on the chicken.
  • Make sure that both sides of the chicken are well coated with the seasonings.
  • Arrange so that the skin side faces up.
  • Roast for 40-45 minutes (until the chicken temperature reaches 162 degrees F).
  • Dump the juice, remove the sprigs, and let the chicken cool down for 5 minutes before serving.

Note: Next time I’ll try seasoning the chicken a day before I cook them (and leave them wrapped in the fridge).

For the salsa:

  • While the chicken is roasting, heat up a small pot over medium heat.
  • Place the tomatoes and let them cook for a few minutes until they become soft and juicy.
  • Add the lemon juice.
  • Mix the onions, peppers, and parsley.
  • Turn off the heat and serve on a bowl.

Serve with these red potatoes and baguettes:

(Click on the image for recipe)

Spicy Beef with Mint

I purchased two cookbooks this month to broaden my cooking horizon. My need for food inspirations is currently being met by Weeknights with Giada: Quick and Simple Recipes to Revamp Dinner and Giada at Home: Family Recipe from Italy and California. I simply love Giada‘s passion for food that transpires through her cooking style and quality. Though rooted in her Italian heritage, Giada’s recipes don’t shy away from being eclectic.

For Monday night dinner, I made Spicy Beef with Mint (also on Weeknights with Giada, pg. 159). This one-pot and Thai-influenced meal was so flavorful and easy to make. The sweet soy sauce, bell peppers, and shallots infused the tender thin slices of beef sirloin with sweetness. Then, the fish sauce, soy sauce, mint and basil leaves made this dish to be pleasantly tangy and aromatic. For an extra kick, Thai peppers and sriracha sauce did a good job in integrating successfully with the rest of the flavors. What an impressive flavor combination and balance!

I followed the ingredient list and steps from the original recipe. A few notes:

  • The recipe on the cookbook calls for sirloin steak (instead of flank as stated on this online recipe). I sliced the sirloin steak into ¼ inch cuts.
  • I used two bell peppers instead of one. One in red and one in yellow to create a nice color combination.
  • I also had some leftover asparagus in the fridge. So I sliced them up (threw out the very bottom white section) and added them into the pot with the basil and mint toward the end of cook time.
  • I happened to have these white basil leaves in the fridge. So that’s what I used instead of the Thai basil.
  • Best served with rice

Serve 4-6 people

Click here to see original recipe: Spicy Beef with Mint 

Beef Chorizo Sloppy Joe – Mini Burger Series

I had been wanting to try beef chorizo. Before this entry, I had only tasted a vegetarian version of chorizo, made from tempeh, and it was delicious. The wonderful smokey and peppery seasonings flavor had stayed in my food memory waiting to be experienced once again.  But how to prepare and enjoy beef chorizo was another question.

One Sunday morning I turned on the TV, flipped to Food Network, and saw an episode of the Sandwich King where the host, by chance, was making: Sloppy Jose with Chorizo, Charred Poblanos, and Avocado Crema. “Well, that’s it,” I thought, “My question received an answer.” 🙂 What a great coincidence. I accepted the show as a sign for me to continue the mini burger fiesta Jeff and I were having. This time it was with beef chorizo!

Here’s my adapted version of the Sandwich King’s recipe:

  • 1 Mexican beef chorizo (the packet I got was 10 oz or a bit more than a half a pound)
  • 1 cup store-bought refrigerated fresh salsa
  • Light shredded mozzarella
  • 2 red bell peppers (julienned)
  • Salt
  • Pepper
  • Cumin powder
  • 4-6 dinner rolls (halved)

Steps:

  • Fire up the grill.
  • Prepare an aluminum foil, fold along the edges to create barrier (so that the meat and salsa won’t run away from the foil while cooking), and poke a few holes in the middle of the foil using a fork (to create a way out for the fat and moisture). Place on the grill.
  • Unwrap the chorizo and place on an aluminum foil.
  • Let the meat cook for 15-20 minutes (I choose to cook it on a grill outside because it could get very smokey and very fragrant).
  • After it cooks for 15 minutes, add the salsa to the meat, and let it cook for another 10 minutes. Place on a plate.
  • Saute the julienned red bell peppers with a little bit of canola oil, salt, pepper, and cumin powder (until the peppers become soft).
  • Toast the buns
  • Sprinkle the cheese on the bottom bun, add a scoop of the chorizo salsa mix, put a couple of sliced peppers on top of the mix, and place the top bun.

Since these sloppy joes are already so flavorful and rich, I opt out of making the avocado crema.

(Makes 6 delicious mini sloppy joes)

Almond Blackberry Cookies – Venturing into the Baking World

I search for great flavor combinations in meals and also in sweets. I appreciate the creativity of balancing tastes, color, and texture in cooking and baking. Though I still feel more passionate about cooking and savory things, I say, “Why not?” to learning the art of baking. The way I see it: I already cook a lot, I might as well be able to make a few great sweets too :). So here’s my latest baking recipe trial that resulted in another favorite for Jeff and I.

Recently, I found this Peanut Butter Cookies with Blackberry Jam recipe from Giada De Laurentiis. The recipe is also included in her latest book, Weeknights with Giada (pg. 215).

I did a few little tweaks to this recipe to fit my preference:

  1. Instead of using ¾ cup of peanut butter, as suggested on the ingredient list, I used ¾ cup of ground raw almonds (that I ran through the food processor with 1/8 cup of olive oil). I blended the raw almonds and olive oil in a food processor until it became as grainy as possible. The almonds mixture did not have the same consistency as peanut butter of course, but I actually liked the chunky and grainy texture better.
  2. I also opted out of the step of rolling the dough in ¼ cup of sugar and went directly to form the doughs into little balls ready for the blackberry filling in the middle. (I also made the dough balls smaller than the ones in the recipe.)
  3. I used blackberry preserves, which I already had in my fridge, instead of jam.

Such delightful little cookies! I love the soft crunch, the subtle nutty almonds, and the sweet and tangy tastes of the blackberry preserves. I see them disappear quickly from our cookie box 🙂

Thin Sliced Steak – Yakiniku Style (Japanese Barbecue)

Eating out with my family make up a huge chunk of my childhood memory. Growing up, Japanese cuisine was big in Indonesia and was one of my family’s favorites. And as far as I could remember the cuisine had a lot more varieties than just the very popular sushi and bento boxes that we have been so accustomed to here these days. My favorite was Yakiniku.

In college, a friend of mine taught me how to make yakiniku at home. (Thanks again for it, Vick!) Each time I make it I am reminded of why I like the dish so much. Aside from the good memories it brings, this easy and savory meat dish is just so full of flavors! The sesame oil gives this warm and nutty aroma while the mixture of soy sauce, garlic, ginger, and cayenne pepper infuses the meat with such an exciting taste.

I like to cook my thin sliced steak on the grill outside. The meat tends to get very smoky when it is done inside, on a gridiron or on a portable gas stove at the table, just like how it is at yakiniku restaurants.

Here’s my super easy version of yakiniku.

Ingredients for the steak:

  • 1 1/2 pounds of thin sliced beef
  • 1 teaspoon of minced garlic
  • ¼ cup of low sodium soy sauce
  • ¼ cup of sesame oil
  • 1 teaspoon of ginger powder
  • 1 tablespoon of cayenne/chili powder

Ingredients for the sides (any of these will work fine):

  • Asparagus
  • Cucumber (peeled and sliced)
  • Lettuce

Steps:

  • Mix all of the ingredients for the steak in a resealable bag (or a bowl and then cover with a plastic wrap) and let it sit in the fridge overnight
  • Grill the meat over high heat. It won’t take long at all to cook since the beef are sliced very thin. So please don’t wander off too far from the grill
  • Remove the hardy bottom part of the asparagus
  • Drizzle asparagus with olive oil, salt, and pepper
  • Grill the asparagus for 4 minutes on each side
  • Serve the cucumber and lettuce on a separate plate as a side
  • Best served with rice

Serve 2 generously

Quinoa Stuffed Bell Pepper

Whoever invented stuffed vegetables was a creative genius. The compact goodness, with plentiful stuffing choices, makes a great meal. I have a list of stuffing and vegetables that I’d like to pair together. But this week the mood for a good cheesy, creamy,  either grain or pasta based, stuffing was heightened. So the search for the right ingredients began.

Curiosity led me to try quinoa for my vegetable stuffing base. I have heard about the grain a lot but have never tried it before. So I had to see what the excitement was all about. I grabbed a small bag of quinoa from the market and learned from the back of it that the grain makes a great substitute for rice and couscous. Right there and then, my cooking planning process began. I stood in the produce aisle, totally switched off from my surrounding, meditating on my next steps. An image of stuffed red bell peppers entered my mind. Next I imagined mixing the cooked quinoa with unsalted butter, light shredded mozzarella, halved grape tomatoes, onions, and a little bit of chop parsley. Then I visualized stuffing the mixture of quinoa into the bell peppers and liking the end result. Here’s the product of my food meditation 🙂

The real cooking process was as easy as I had pictured it in my mind. And even better, the result was as tasty as I had hoped for. Quinoa’s subtle nutty flavor and soft crunchy texture pair well with the sweet  and tender red bell peppers and tomatoes and with the savory cheese. I imagine the grain would be great in different styles of cooking too. Ideas already pop up in my head for the next quinoa-based meal. I’ll be sure to write them down and give them a try. More to come later!

Ingredients:

  • 1 cup of quinoa
  • 2 cups of chicken stock
  • A handful of chopped parsley
  • ¼ chopped onions
  • A handful of halved grape tomatoes
  • 1 tablespoon of unsalted butter
  • 2 handful of light shredded mozzarella
  • 3 red bell peppers (remove the top and the seeds)
  • Salt
  • Pepper
  • Cayenne pepper (optional)

Steps:

  • Preheat oven to 350 degrees
  • In a small pot, cook 1 cup of quinoa with 2 cups of chicken stock. Stir and bring to boil. Close with a lid and let cook for 20 minutes (I followed the cooking instruction on the bag).
  • After 20 minutes, turn the heat off, add butter and stir until it melts
  • Add the shredded mozzarella
  • Add the grape tomatoes, onions, parsley, salt, and pepper into the mixture and mix well
  • Scoop the mixture and fill up the bell peppers
  • Top with a little bit more of mozzarella
  • Using your fingers, coat the outer part of the pepper with a little bit of olive oil
  • Place the stuffed bell peppers on a baking dish, add a little water on the bottom of the dish (like two tablespoon of water). Bake for 20-25 minutes or until the bell peppers become a bit wrinkly and soft.

Sweet Peppers with Artichoke Hearts Salad – A Side to My Mini Burgers

I’m finding more things to like: roasted sweet peppers. They make such a wonderful side dish. These pretty and colorful little things complement savory dish very well. Recently I mixed them with artichoke hearts, another fave, and served alongside my turkey and halibut mini burgers. The result? The three make a  superb combination, light but substantial. Definitely a great springtime dinner menu.

Inspired by a fellow blogger’s post at We Call Him “Yes! Chef!”

Here’s what we will need:

  • A bunch of sweet peppers (mini or regular ones are fine – I happened to have the mini ones for at the time)
  • A jar of marinated artichoke hearts (halved)
  • A tablespoon of olive oil

Steps (while my turkey patties and halibut fillets are grilling outside):

  • Drizzle olive oil on the peppers and mix with both hands. Place on a baking sheet
  • On a separate baking sheet, place the halved artichoke hearts
  • Set the oven to broil
  • Place both peppers and artichoke hearts in the oven for about 5 minutes or until the peppers’ skin turn darker
  • Take both out of the oven
  • Place the peppers in a bowl and cover with a plastic wrap to steam. Then the skin can come off easily
  • Chop the peppers and mix with artichoke hearts
  • Serve on the side of these guys: