Heavenly Buttery Soft Broccoli

A new favorite Brocolli cooked with anchovies by Harini

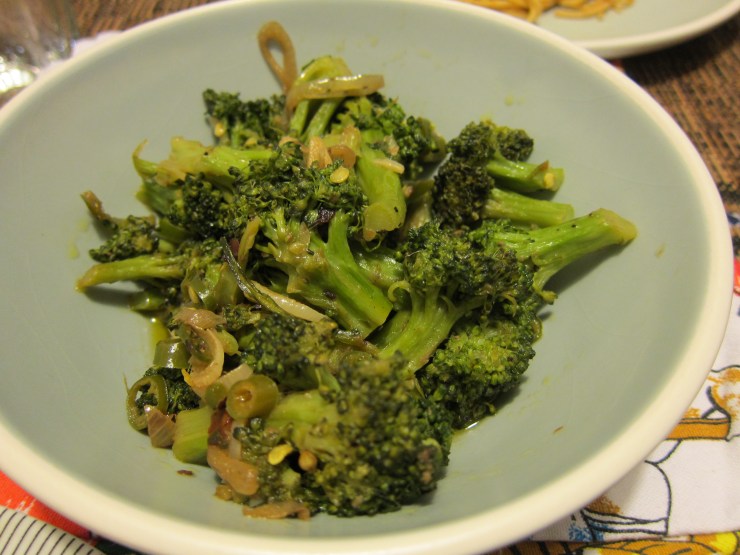
Salty and aromatic, garlicky, and buttery soft broccoli! The dish has earned a spot on my favorite list. Thanks, Food52. The trick? Immerse the vegetable in boiling water (also known as blanching) for five minutes and then cook it with olive oil, garlic, chili peppers, and anchovies. Yes, anchovies! The result? Incredibly tender, savory, but yet sweet broccoli that would melt in your mouth.

I do mine slightly different from Food52‘s recipe. Here’s my adapted version:

(Serve 2)

  • 1 bunch of broccoli (a bunch that would be enough for two people). I remove the florets by hands and make sure that they’re not too chunky.
  • 8 anchovies (chopped). I use marinated ones. The original recipe asks for 4 anchovies but I think 8 make my dish much more flavorful. I believe anchovy is the key ingredient here 😀
  • 3 garlic (chopped)
  • 3—4 tablespoon of olive oil
  • 4 hot finger peppers or 2 Thai peppers (chopped)
  • Black pepper

Steps:

  • Fill 1/3 of a medium pot with water and bring to boil over medium heat
  • Add broccoli florets into the water, cover the pot, and let simmer for five minutes
  • Meanwhile, heat a medium pan (over medium heat) and add olive oil, garlic, anchovies, and chili peppers. Stir frequently and let them cook for one minute or until the anchovies start to melt in the oil. Reduce the heat.
  • Once the five minutes of hot bath is done, drain the broccoli, and add into the pan
  • Stir and mix the broccoli with the olive oil-anchovies concoction. Add black pepper. Cover the pan, lower the heat, cook for another three minutes (until the broccoli become soft), and then turn off the heat. Let the broccoli stay in the covered pan to soak the olive oil, anchovies, garlic, and peppers for at least half hour before serving. (The original recipe calls for 2 hours of cooking over low heat, but I find that my broccoli gets soft enough after the blanching, then the three-minute cooking with anchovies, and the half hour of resting in the covered pan. I think the heat gets trapped and continues to cook the vegetable for a while.)

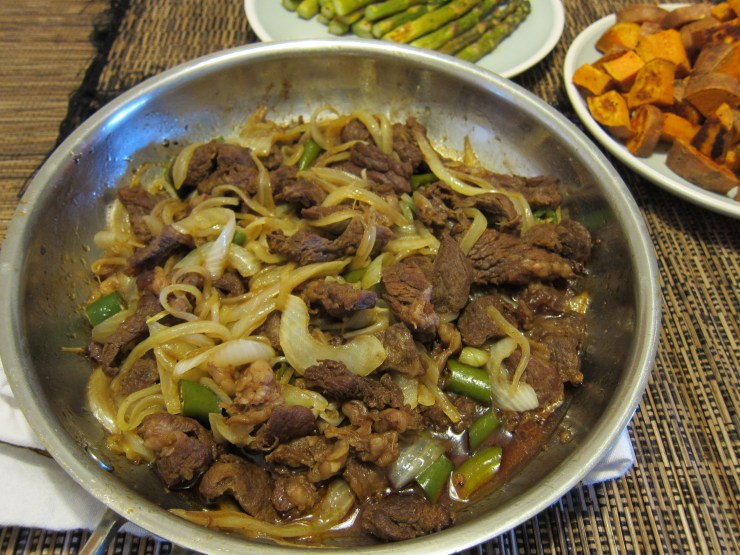
Great to serve by itself, over rice, on top of egg noodle or pasta, or as a side dish to Yakiniku-style Beef and Sauteed Onion.

Inspired by a similar recipe using the same method of cooking, I tried my recipe above with carrots! I found that shredded or thin-sliced carrots work better for this method. I skip the blanching part and just cook the carrots directly in the anchovies-garlic-chili pepper infused olive oil. Stir and mix them well, cover the pan, lower the heat a bit, and let it cook for about 10-15 minutes. Turn the heat off and let the carrots rest in the covered pan for half hour before serving. The mixture of anchovies, garlic, and chili peppers magically brings out the natural sweetness of the carrot. So good!

Carrot cooked in anchovies-garlic-chili peppers infused olive oil by Harini

Hope you like it. Thanks for visiting!

Peace

Yakiniku-Style Beef and Sauteed Onion

Yakiniku style beef with sauteed onion by Harini

Sometimes I run out of cooking ideas. When it happens, I employ the easiest technique to get inspired: asking my family and friends about their dinner menu plan :D. It was how this recipe came about. I sent a text asking a friend, “What are you cooking for dinner tonight?” She replied, “Beef cooked with onions. Easy breezy and delicious!” She told me that she cooked the beef (cube cuts) with salt, pepper, sweet soy sauce, tamarind juice and then set them aside on a plate. Then using the same pan she sauteed the onions, garlic, chili peppers, and bitter bean. Once the vegetables are done, she put the beef back in the pan and mixed the two together. Ah! That really sounded good and easy. I really liked that one-pan cooking method and the sauteed onion part. I love sauteed onion! See, these food talk rarely fail to spark cooking ideas in me.

I think the beauty of cooking is that it allows individual creativity. In dealing with recipes, most of the time I adjust spices and sauces based on what I have in the kitchen and my mood. In this case, I didn’t have tamarind or bitter bean. Also, I was in the mood for Yakiniku-style beef. So, borrowing my friend’s cooking method and some of the ingredients in her recipe, I created my Yakiniku-style beef and sauteed onion instead :D. The smokey and nutty aroma of sesame oil was so inviting. My sauteed onion added a hint of sweetness in the spicy sauce. Together they create this delightful flavor combination.

Ingredients for Yakiniku-style beef:

  • 1 pound of beef (I sliced it to thin cuts)
  • 4 tablespoon of sesame oil
  • 3 chopped garlic
  • 4 tablespoon of light soy sauce
  • 1/2  tablespoon of ginger powder
  • 1 tablespoon of chili powder
  • 1/2 tablespoon of black pepper

Ingredients for the sauteed onion:

  • 1 (smaller) sweet onion (slice into thin cuts)
  • 2-3 hot finger peppers (slice it into chunky cuts or thin cuts, your call)

Steps:

  • Mix: sesame oil, chopped garlic, soy sauce, ginger powder, chili powder, and black pepper in a bowl. Add beef into the bowl and make sure  it is coated well with the marinade. Place it in a zip lock bag and let it marinade for 1/2 to 1 hour in the fridge.
  • Once marinating time is up, heat a large pan (over medium heat)
  • Add beef along with the marinade into the pan and let it sizzle. Cover with a lid and cook for 3–4 minutes while stirring frequently.
  • Once cooked through, remove meat from the pan (leave the sauce) and set aside
  • Reduce the heat a little bit. Using the same pan, with the sauce and oil from cooking the beef, saute the chopped onion and chili peppers. Cover with a lid and let them cook until the onions become soft and translucent. They should taste sweet and delicious.
  • Bring back the beef into the pan and mix it with the onion, chili peppers, and sauce. Cover with a lid and let them cook for another 2  minutes
  • Great to serve with jasmine rice.  Roasted sweet potatoes and asparagus also make good companies for this main dish.

Serve two

Yakiniku style beef with sauteed onion by Harini

Hope you like it. Thanks for reading!


Mango Sambal Over Broiled Tilapia

In Surabaya, there’s this incredible sambal mangga or chili pepper condiment that is mixed with thin-sliced mango. (In Bahasa Indonesia: sambal refers to crushed chili peppers mixture and mangga means mango.) The condiment is usually served with grilled fish, squid, or prawn, and steaming hot jasmine rice. It is simply to die for, as my sister would say. This sambal and the grilled seafood are my must-haves when I return to my homeland. Here’s what the condiment looks like. Whenever I look at this picture, I experience a Pavlov’s dog moment. Ding!

Mango Chili Pepper Condiment at Asia Baru Restaurant in Surabaya
Thin-sliced mango in chili peppers: A condiment at Asia Baru Restaurant in Surabaya (Picture by Harini, 12/12)

Inspired by mango sambal at a local seafood restaurant in Surabaya, I created something similar to accompany my broiled Tilapia.

Tilapia covered by Mango Sambal
Tilapia covered by Mango Sambal by Harini

Here is how I do the manggo sambal (My recipe for the broiled Tilapia is right below it.)

Warning: Spicy!

We will need:

  • 1 mango (I find one that is ripe but not too soft)
  • 3  Thai peppers
  • 5 hot finger peppers
  • 2 shallots
  • 1 garlic
  • 1 small tomato (or 4 grape tomatoes)
  • Salt

Steps:

  • I peel the mango and gently slice it into thin cuts (lengthwise). Then stack the mango meat together and start slicing them into skinny cuts. Plate them and set aside.
  • Make the sambal in a food processor by mixing and chopping: Thai peppers, tomato, hot finger peppers, shallots, garlic. Add salt.
  • Mix the mango and sambal together.

Mango sambal by Harini

For the broiled Tilapia: (or your preferred mild-tasting fish), we’ll need:

  • 4  fillets (thawed)
  • Salt
  • Pepper
  • Ginger powder (a pinch)
  • Turmeric powder (a pinch)
  • Coriander powder (a pinch)
  • 1 tablespoon of vegetable oil
  • 1 Lime (lemon works too)

Steps:

  • In a bowl, mix vegetable oil, salt, pepper, ginger powder, turmeric powder, coriander powder, lime juice from half of lime 
  • Coat the fillets with the marinade and let them sit for 15 minutes. Make sure they are coated evenly on both sides.
  • Heat the oven broiler
  • Grease the oven tray and place the fillets on it.  Broil for 8-12 minutes (no turning) until the fillets turn golden brown, crispy on the outside, and flaky in the inside. Give at least 6 inches of distance between the broiler and the tray.

Broiled Tilapia by Harini

Plate the fish and top with the mango sambal. Serve with hot jasmine rice. Add some more lime juice from the other half if necessary.

Ding!

Serve with rice by Harini

More Tilapia recipes:

Crispy Baked Tilapia

Spiced Up, Steamed, and Broiled Tilapia

Have a great weekend!

Roasted Brussels Sprouts, Sweet Potatoes, and Sweet Onion

Once upon a time, there was a girl who didn’t like any vegetables. Not peas, not broccoli, not spinach, not eggplant. Brussels sprouts? Forget it. I heard that trying to convince her to try vegetables was nearly impossible. So I never tried. Until one day, her friends ordered a plate of delicious roasted Brussels sprouts. Yummy, crunchy, and crispy. She tasted one and became a believer. A believer in the fact that vegetables can be (even more) tasty and enjoyable when seasoned and prepared in certain ways. The girl is a dear friend of mine. She gave me her permission to use this story as long as she remained nameless :D. So I dedicate this entry to her: my good friend who is, slowly but surely, starting to enjoy delicious vegetables.

Roasted Veggie Combo by Harini

I think of food preference as something personal, cultural, and habit driven. Sometimes, I feel like it is also colored by each individual’s beliefs, experiences, memories, and perception. A fascinating thing to observe. So I digress. Anyway, in the spirit of enjoying tasty and delightful veggies, I offer you my latest favorite side dish, late night snack, and (sometimes) breakfast. I like them THAT much!

Roasted Veggie Combo by Harini

My current favorite roasted-veggie combo contains of Brussels sprouts, sweet potato, and sweet onion. The sweet potato and onion absorb the spicy chili powder, salt, and black pepper really well. The vegetables’ natural sweetness and peppery seasonings complement the nutty flavor of Brussels sprouts nicely. Here’s how I do it. We will need:

Brussels sprouts

  • 10 Brussels sprouts (Remove Brussels sprouts’ end of the stem and outer leaves. Halve the vegetable.)
  • 1 sweet potato (Cut into thin wedges)
  • ½ sweet onion (Slice into thin wedges)
  • Extra virgin olive oil
  • Salt
  • Black pepper
  • Chili powder

Steps:

  • Preheat the oven to 400 degrees Fahrenheit
  • Drizzle the vegetables with olive oil and sprinkle with salt, black pepper, and chili powder. Coat each one of them.
  • Place all vegetables on a large oven tray. Give space between vegetables, avoid crowding them up.
  • Let them roast for 15 minutes, flip, and cook again for another 5 or 7 minutes.
  • Serve 2

Note: Sometimes, when I do Brussels sprouts only, I just broil them for about 5–8  minutes. Heat the broiler for a minute before starting. I give more than 8 inches of distance between the broiler and the tray, or use the middle or lower rack, and leave the oven door ajar, just a little bit, to avoid charring.

Broiled Brussels Sprouts by Harini

Hope you like it. Thanks for visiting!

Great tips on roasting veggies from Food52

How to Roast Any Vegetables

More Brussels sprouts recipes:

Caramelized Brussels Sprouts

Potato with Shiitake Mushroom, Sweet Corn, and Brussels sprouts