Grilled Nutella Sandwich Dusted with Powdered Sugar

Nutella sandwich dusted with powdered sugar by Harini
Nutella sandwich dusted with powdered sugar (by Harini)

Years ago, my friends and I frequented Quartino in Chicago. We would go to this Italian tapas restaurant, usually, right after work. Most of us worked, some lived, in downtown Chicago at that time. So Quartino was a good place in a central location  for a bunch of friends to regroup and replenish. We’d sit at the lively bar section, crowded our small table with wine, pizza, cheese, various small plates, and some desserts. Conversations about work, bosses, coworkers, relationships, dating, would swim together with other topics like cultures, politics, and whatever world affairs happening at the time. Time has flown by, people have moved away, but Quartino remains to be a memorable hang out spot for me.

grilled nutella sandwich by Harini

Recently, I had the chance to return to the restaurant with a couple of old friends. One of them had mentioned Quartino earlier that day and our afternoon saunter just happened to take us close to the place. So we took it as a sign to pay a visit.

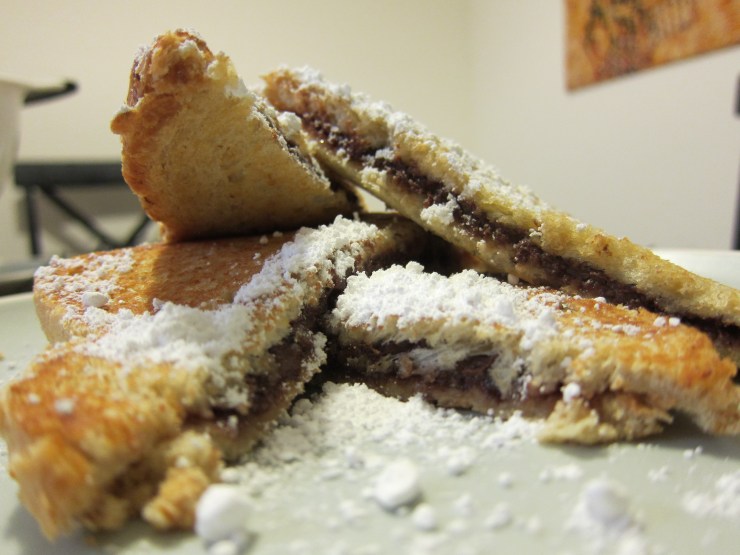
Far from feeling hungry, we just ordered drinks. But then my friend Farah asked the server, “Do you guys still have Nutella Panino?” The server said yes and took the order. I had forgotten about this simple/cannot-go-wrong dessert. Then I remembered how most of my sweet tooth friends loved this grilled Nutella sandwich. Why wouldn’t they? It’s a sandwich filled with Nutella spread, grilled, cut up, and dusted with powdered sugar!

Back in my apartment, I made my version of the panino for Jeff. I think it may have made him fell in love all over again—either with me or with Nutella 😀

So here’s how I do my version of Nutella Panino.

(Eater discretion is advised)

To serve two, we will need:

  • 4 slices of bread (I am loving these Wholesome Oatmeal bread at the moment)
  • Nutella spread
  • A little bit of butter
  • A little bit of powdered sugar

oatmeal bread

Grill the sandwich and gently press down with a small pan lid

Steps:

  • Heat up a small non-stick pan. Stay on medium heat. (I don’t have a panini press so I grill the sandwich manually)
  • Spread Nutella on one side of a bread and cover with another bread
  • Add a little bit of butter on the hot pan until it is melted
  • Place the sandwich on the pan, grill, and press very gently with a small pan lid until the bread gets that nice golden color
  • Turn and grill the other side
  • Remove and let it cool down
  • Repeat the steps for the other sandwich
  • Cut up the sandwiches
  • Dust with powdered sugar

Great snack to serve with dark, robust coffee.

Hope you like it and thanks for visiting!

Buon Appetito!

cut up Nutella sandwich by Harini

Nutella sandwich by Harini

To my old Chicago pals

Stir Fry: Green Beans and Tempeh

I enjoy a tasty and crunchy vegetable dish. When I want an easy one, I often turn to stir-frying (similar to sautéing) things like green beans, bitter melon, asparagus, broccoli, Chinese broccoli, Napa cabbage, carrots, and many more. Cook with a little bit of oil, shallots, garlic, hot peppers, and light soy sauce and watch how the vegetables turn into wonderful delights. When I want something more substantial out of these veggies, I combine them with either Shiitake mushroom or tempeh. Superb!

Green Beans and Tempeh by Harini

Green beans and I go back a long way. Years ago in early college days, days of my first attempts to cook, a friend noted that I cooked green beans a lot. He’d joke and say that it seemed like it was the only thing I was able to do :D. He wasn’t wrong. It was! 😀

Tempeh with Green Beans by Harini

Anyway, in this recipe I choose to mix crunchy green beans with tempeh. Tempeh, a soybeans-based patty, is so versatile and a source of protein. Indonesians use it as their meat substitute. Here in the US, tempeh can be easily found in the organic section.

Ingredient list:

  • 1 organic soy tempeh (8 oz) (cut into four pieces and slice into thin cuts)
  • A handful of green beans (about 2 cups)
  • 2 shallots (chopped)
  • 2 garlic (chopped)
  • 2 Thai peppers, also called as Bird’s Eye peppers (chopped)
  • 2 tablespoon of light soy sauce
  • 3 tablespoon of vegetable/canola oil
  • ¼ cup of water

Steps:

  • Heat up a medium pan over medium heat
  • Add 2 tablespoon of vegetable/canola oil
  • Brown both sides of tempeh (turn only once)
  • Remove from the pan and set aside
  • On the same pan, use remaining oil if available, if not, add 1 tablespoon of vegetable/canola oil
  • Add shallots and garlic and let them cook for 2-3 minutes
  • Add the light soy sauce, Thai peppers, and green beans
  • Stir and mix them together
  • I usually add a little bit of water to help the vegetable cook better (about 1/4 cup)
  • Cover the pan with a lid and let it cook for about 5 minutes or until the liquid starts to boil. Taste and adjust.
  • Remove pan from the heat and add the cooked tempeh. Mix everything together and serve with jasmine rice.

Hope you like it!

More favorite tempeh recipe:

Tempeh with Chilies and Vegetables

Chili-Topped Tempeh

***

A little reflection:

I think of cooking, like writing, as one of my creativity outlets. One that allows flow to happen and take over me for a little bit. Maybe my friend and fashion blogger (and a fellow cooking enthusiast), Leena, would agree that there are some similarities in the process of putting together a beautiful outfit and making a delicious dish. I imagine they both require imaginative minds; attention to texture, colors, feel, and in cooking: taste; and appreciation for beauty. Best of all, they both create enjoyable results!

Cooking might not create flow for everyone as it does for me. Besides, different folks different strokes, right?

So, what about you, dear readers?

What fully absorbs and captures your creative energy?

Egg Noodles and Sea Scallops in Eggplant, Pepper, and Tomato Sauce

Egg Noodle with Scallops in Eggplant/Tomato Sauce by Harini

My kind of pasta dish: spicy and loaded with seafood and vegetables.

Egg Noodles with Sea Scallops in Eggplant/Tomato Sauce by Harini

Last summer, I wrote about an eggplant/peppers/tomato dish that I learned from a good friend of mine. I really liked the dish and this time I decided to mix it up with some egg noodles and sea scallops. Definitely another favorite pasta dish: light, infused with great fresh produce flavors, and boy…would you just look at the colors! Such a treat for the palate AND the eyes.

Here’s how I do the eggplant/peppers/tomato sauce:

  • Get 2-3 smaller and skinnier eggplants (or 1 big eggplant)
  • Halve the eggplants and cut into 4 long pieces
  • Chop them up into shorter cuts
  • Dice 4 medium size tomatoes
  • Mince 4-5 garlic
  • Chop 1 red bell pepper
  • Chop 5-7 hot finger peppers (Serrano or jalapeno would work too. Warning: spicy! Please adjust to your spicy-tolerance level)
  • Heat up a medium pot with a tablespoon of olive oil
  • Let the garlic sizzled for 2 minutes, add all of the above, sprinkle a little salt and pepper into the pot
  • Close with a lid and cook until the eggplants turned soft and translucent (15-20 minutes over medium heat)

Prepare the egg noodles:

  • Bring water to a boil in a medium pot, add a little bit of olive oil and salt, and cook 2-3 cups of egg noodles for about 6-8 minutes (or as directed on the bag)
  • Drain and set aside

Prepare the sea scallops:

  • Drizzle extra-virgin olive oil and lemon juice from 1-2 lemons on the (thawed) 8-10 scallops
  • Sprinkle a little bit of salt and black pepper
  • Let them sit for about 10-15 minutes to marinate
  • Heat up a non-stick pan (medium heat) and sear the scallops for 2-3 minutes on each side (until both sides get that beautiful golden crust).
  • Set aside

Mix the egg noodles with the eggplant/pepper/tomato sauce, top it with some scallops, and eat up! :).

(Serve 2)

We’re inching closer to spring time in this part of the world. Still cold. But at least the sun is out today! Wishing you all for some good weather wherever you are.

Thanks for stopping by!


Spicy Shredded Chicken

Spicy Shredded Chicken by Harini

(My version of Ayam Suwir. Origin: Bali)

Another big hit at home: tender, juicy, flavorful shredded chicken, covered in a mixture of cooked chili peppers. There’s heat, spices, but also a hint of sweetness from the cooked peppers, shallots, and garlic. Very exciting for the palate, that’s for sure. I learned about this dish from a friend from Bali many years ago and have been a fan ever since.

Like many of you cooking enthusiasts out there, I adjust recipes to suit my taste preference. Here’s a version that I am very pleased with, for now ;).

Note: Some prefer to boil the chicken with spices until it is cooked, then shred, and mix it with the blended and cooked chili peppers mixture. I, however, find that when boiled, the chicken gets to be a bit too dry. So what I do is I marinate the chicken overnight or half a day, roast it in the oven, shred, and mix with the peppers.

Serve 3-4

Ingredient list:

For the roast chicken:

  • 5-6 chicken thighs, bone-in and skin-on (chicken breast would work too)
  • 4 shallots
  • 4 garlic
  • 3 keffir lime leaves (could be substituted with lime zest from 2 limes)
  • 1 lemon grass (could be substituted with lemon zest from 1 lemon)
  • 1 inch of galanga root
  • 2 teaspoons of coriander powder
  • ½ teaspoon of turmeric powder
  • ½ teaspoon of ginger powder
  • Salt

For the chili pepper mixture:

  • 1 red bell pepper
  • 4 Thai peppers (also called Bird’s eye chili). Please adjust to your spicy-tolerance level.
  • 3 shallots
  • 3 garlic
  • Salt
  • 1 tablespoon of vegetable or canola oil

Steps in preparing the chicken:

  • Fill up 1/3 of a medium/large pot with water
  • Chop in a food processor: shallots, garlic, and keffir lime leaves. Add them into the pot of water along with lemon grass, galanga root, coriander, turmeric, ginger powder, and salt to create the marinade for the chicken.
  • Bring the marinade liquid to a boil and remove from the heat.
  • Add the chicken into the marinade liquid, cover with a lid, and let it cool down before moving it to the fridge (marinate for half a day or overnight).

After the marinating is done, place the chicken on an oven tray, heat up the oven to 400 degree F, and roast it for 30-40 minutes (until it reaches 165 degrees F). Once the chicken is cooked, let it cool down, and shred it using a fork. Remove the bones.

While the chicken is roasting, prepare the chili pepper mixture:

  • Chop in food processor: bell pepper, Thai (Bird’s eye) peppers, shallots, and garlic.
  • Heat up a medium pan and add vegetable oil (over medium heat)
  • Add the pepper, shallot, and garlic mixture into the pan and let it cook for 6-8 minutes or until the moisture evaporates.
  • Remove from the heat.
  • Add and mix the shredded chicken

Shredded chicken mixed in chili peppers

Serve with jasmine rice and a side of stir-fried cabbage with green onions. Why cabbage? I think cabbage is naturally sweet therefore a great neutralizer for my spicy chicken. I chop up 1-2 garlic, 2 green onions, ½ of cabbage. I cook the garlic and green onions with a little bit of vegetable oil and add the chopped cabbage. I add a little bit of water to help the cabbage cook faster, sprinkle a little bit of salt, cover the pan with a lid, and let it cook for 5 minutes or until the vegetable wilt. Remove excess water before serving. (Optional: scrambled eggs make a nice addition to the cabbage dish too.)

Stir-fry cabbage by Harini

Hope you like it!

Have a great week, everyone. Thanks for reading.

Green Pea Salad Over Broiled Halibut

Green pea salad by HR

People say we eat with our eyes. There might be some truth to that statement. I like this warm green pea salad recipe, another creation of Giada De Laurentiis, not only for its taste but also for its beautiful colors.

I must admit that I never really thought much of green pea before, let alone turning it into something appetizing. To me it was just some complementary vegetable used in a soup or in fried rice or just served (sadly and quietly) steamed as a side of something else better and tastier. And Jeff confirmed. He said he didn’t really care for green pea until he tried this salad. In this recipe, the vegetable gets a special attention enough to transform its plain being into a flavorful and visually appealing dish. Sometimes it really does depend on how we cook things, doesn’t it?

Green peas salad on broiled halibut by HR

In Giada’s recipe, the salad is served over baked halibut fillets. As usual, I did a few things differently. First, I used regular green pea instead of petite pea. Second, I made the salad a little bit garlicky and of course spicy by adding Serrano peppers ;). Third, since I prefer to have my fish crispy on the outer part and flaky inside, I broiled the halibut instead of baking it. Lastly, the recipe called for fresh mint and thyme, which I didn’t have this second time I made it so I went without.

The result? Sweet but yet spicy with a hint of lemon, nicely seasoned, and surprisingly filling salad. A perfect companion to the flavorful, lemony, and flaky broiled fish. The combination makes a great dinner menu. I added boiled potatoes drizzled with olive oil and sprinkled with salt and pepper as a side but I really didn’t need to. The fish and salad were quite filling by themselves.

Here’s my adapted version to serve two people:

Salad ingredient list:

  • 1 small bag of frozen peas (thawed)
  • 4 garlic (chopped)
  • 3 shallots (thin sliced)
  • 1 red bell pepper (sliced)
  • 3 table spoons of extra virgin olive oil
  • 2 Serrano peppers (you could also use other bigger peppers like jalapeno, hot fingers, cayenne, etc.)
  • Lemon zest from 1 lemon

Broiled halibut ingredient list:

  • 2 halibut fillets (enough for two people)
  • Lemon juice from 2 lemons
  • 3 garlic (chopped)
  • 1/4 extra virgin olive oil
  • Salt and black pepper

Steps:

  • As suggested in the original recipe: I mixed the lemon juice, chopped garlic, olive oil, salt and pepper in a bowl. Then I added the halibut fillets in the bowl, covered it with a plastic wrap, and let the fillets marinate for about 30 minutes in the fridge.
  • Then I heated up a medium pan and added: olive oil, garlic, shallots, and bell pepper to cook for about 6 minutes until they became soft and translucent. Once they were cooked, I turned off the heat, and added the thawed peas, salt, pepper, and lemon zest. Mixed all of them together nicely and set aside.
  • After the 30 minutes marinating time was up, I placed the halibut fillets on an oven tray (sprayed with olive oil), and broiled them for 10-13 minutes (no turning) or until they had these golden color around the edges. I also made sure that there was about 6 inches (about 15 cm) distance between the broiler and the tray to avoid charring.
  • I served the fillets and topped them with the green pea salad.

Green peas salad on top of broiled halibut by HR

Thanks for coming and have a great day!

Original Recipe: Roasted Halibut with Pea and Mint Salad, (De Laurentiis, Giada. Giada at Home. Clarkson Potter, 2010. Pg. 134)

Online version: Roasted Halibut with Pea and Mint Salad